Tag: c

Machine Learning, Python

PyTorch 1.0 tracing JIT and LibTorch C++ API to integrate PyTorch into NodeJS

Update 28 Feb 2019: I added a new blog post with a slide deck containing the presentation I did for PyData Montreal.

Today, at the PyTorch Developer Conference, the PyTorch team announced the plans and the release of the PyTorch 1.0 preview with many nice features such as a JIT for model graphs (with and without tracing) as well as the LibTorch, the PyTorch C++ API, one of the most important release announcement made today in my opinion.

Given the huge interest in understanding how this new API works, I decided to write this article showing an example of many opportunities that are now open after the release of the PyTorch C++ API. In this post, I’ll integrate PyTorch inference into native NodeJS using NodeJS C++ add-ons, just as an example of integration between different frameworks/languages that are now possible using the C++ API.

Below you can see the final result:

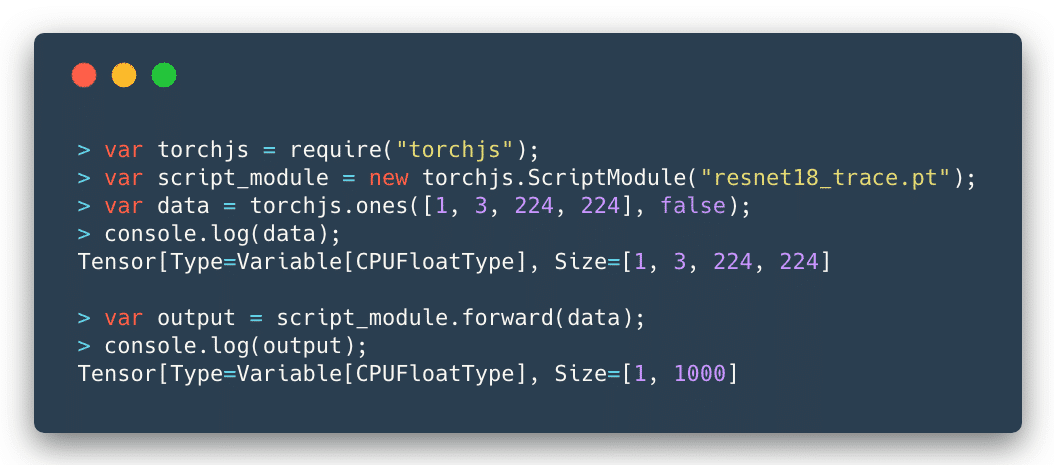
As you can see, the integration is seamless and I could use a traced ResNet as the computational graph model and feed any tensor to it to get the output predictions.

Introduction

Simply put, the libtorch is a library version of the PyTorch. It contains the underlying foundation that is used by PyTorch, such as the ATen (the tensor library), which contains all the tensor operations and methods. Libtorch also contains the autograd, which is the component that adds the automatic differentiation to the ATen tensors.

A word of caution for those who are starting now is to be careful with the use of the tensors that can be created both from ATen and autograd, do not mix them, the ATen will return the plain tensors (when you create them using the at namespace) while the autograd functions (from the torch namespace) will return Variable, by adding its automatic differentiation mechanism.

For a more extensive tutorial on how PyTorch internals work, please take a look on my previous tutorial on the PyTorch internal architecture.

Libtorch can be downloaded from the Pytorch website and it is only available as a preview for a while. You can also find the documentation in this site, which is mostly a Doxygen rendered documentation. I found the library pretty stable, and it makes sense because it is actually exposing the stable foundations of PyTorch, however, there are some issues with headers and some minor problems concerning the library organization that you might find while starting working with it (that will hopefully be fixed soon).

For NodeJS, I’ll use the Native Abstractions library (nan) which is the most recommended library (actually is basically a header-only library) to create NodeJS C++ add-ons and the cmake-js, because libtorch already provide the cmake files that make our building process much easier. However, the focus here will be on the C++ code and not on the building process.

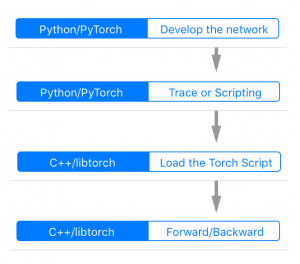
The flow for the development, tracing, serializing and loading the model can be seen in the figure on the left side.

It starts with the development process and tracing being done in PyTorch (Python domain) and then the loading and inference on the C++ domain (in our case in NodeJS add-on).


Wrapping the Tensor

In NodeJS, to create an object as a first-class citizen of the JavaScript world, you need to inherit from the ObjectWrap class, which will be responsible for wrapping a C++ component.

#ifndef TENSOR_H
#define TENSOR_H

#include <nan.h>
#include <torch/torch.h>

namespace torchjs {

class Tensor : public Nan::ObjectWrap {
 public:
  static NAN_MODULE_INIT(Init);

  void setTensor(at::Tensor tensor) {
    this->mTensor = tensor;
  }

  torch::Tensor getTensor() {
    return this->mTensor;
  }

  static v8::Local<v8::Object> NewInstance();

 private:
  explicit Tensor();
  ~Tensor();

  static NAN_METHOD(New);
  static NAN_METHOD(toString);
  static Nan::Persistent<v8::Function> constructor;

 private:
  torch::Tensor mTensor;

};

}  // namespace torchjs

#endif

As you can see, most of the code for the definition of our Tensor class is just boilerplate. The key point here is that the torchjs::Tensor will wrap a torch::Tensor and we added two special public methods (setTensor and getTensor) to set and get this internal torch tensor.

I won’t show all the implementation details because most parts of it are NodeJS boilerplate code to construct the object, etc. I’ll focus on the parts that touch the libtorch API, like in the code below where we are creating a small textual representation of the tensor to show on JavaScript (toString method):

NAN_METHOD(Tensor::toString) {
  Tensor* obj = ObjectWrap::Unwrap<Tensor>(info.Holder());
  std::stringstream ss;

  at::IntList sizes = obj->mTensor.sizes();
  ss << "Tensor[Type=" << obj->mTensor.type() << ", ";
  ss << "Size=" << sizes << std::endl;

  info.GetReturnValue().Set(Nan::New(ss.str()).ToLocalChecked());
}

What we are doing in the code above, is just getting the internal tensor object from the wrapped object by unwrapping it. After that, we build a string representation with the tensor size (each dimension sizes) and its type (float, etc).

Wrapping Tensor-creation operations

Let’s create now a wrapper code for the torch::ones function which is responsible for creating a tensor of any defined shape filled with constant 1’s.

NAN_METHOD(ones) {
  // Sanity checking of the arguments
  if (info.Length() < 2)
    return Nan::ThrowError(Nan::New("Wrong number of arguments").ToLocalChecked());

  if (!info[0]->IsArray() || !info[1]->IsBoolean())
    return Nan::ThrowError(Nan::New("Wrong argument types").ToLocalChecked());

  // Retrieving parameters (require_grad and tensor shape)
  const bool require_grad = info[1]->BooleanValue();
  const v8::Local<v8::Array> array = info[0].As<v8::Array>();
  const uint32_t length = array->Length();

  // Convert from v8::Array to std::vector
  std::vector<long long> dims;
  for(int i=0; i<length; i++)
  {
    v8::Local<v8::Value> v;
    int d = array->Get(i)->NumberValue();
    dims.push_back(d);
  }

  // Call the libtorch and create a new torchjs::Tensor object
  // wrapping the new torch::Tensor that was created by torch::ones
  at::Tensor v = torch::ones(dims, torch::requires_grad(require_grad));
  auto newinst = Tensor::NewInstance();
  Tensor* obj = Nan::ObjectWrap::Unwrap<Tensor>(newinst);
  obj->setTensor(v);

  info.GetReturnValue().Set(newinst);
}

So, let’s go through this code. We are first checking the arguments of the function. For this function, we’re expecting a tuple (a JavaScript array) for the tensor shape and a boolean indicating if we want to compute gradients or not for this tensor node. After that, we’re converting the parameters from the V8 JavaScript types into native C++ types. Soon as we have the required parameters, we then call the torch::ones function from the libtorch, this function will create a new tensor where we use a torchjs::Tensor class that we created earlier to wrap it.

And that’s it, we just exposed one torch operation that can be used as native JavaScript operation.

Intermezzo for the PyTorch JIT

The introduced PyTorch JIT revolves around the concept of the Torch Script. A Torch Script is a restricted subset of the Python language and comes with its own compiler and transform passes (optimizations, etc).

This script can be created in two different ways: by using a tracing JIT or by providing the script itself. In the tracing mode, your computational graph nodes will be visited and operations recorded to produce the final script, while the scripting is the mode where you provide this description of your model taking into account the restrictions of the Torch Script.

Note that if you have branching decisions on your code that depends on external factors or data, tracing won’t work as you expect because it will record that particular execution of the graph, hence the alternative option to provide the script. However, in most of the cases, the tracing is what we need.

To understand the differences, let’s take a look at the Intermediate Representation (IR) from the script module generated both by tracing and by scripting.

@torch.jit.script
def happy_function_script(x):
    ret = torch.rand(0)
    if True == True:
        ret = torch.rand(1)
    else:
        ret = torch.rand(2)
    return ret

def happy_function_trace(x):
    ret = torch.rand(0)
    if True == True:
        ret = torch.rand(1)
    else:
        ret = torch.rand(2)
    return ret

traced_fn = torch.jit.trace(happy_function_trace,
                            (torch.tensor(0),),
                            check_trace=False)

In the code above, we’re providing two functions, one is using the @torch.jit.script decorator, and it is the scripting way to create a Torch Script, while the second function is being used by the tracing function torch.jit.trace. Not that I intentionally added a “True == True” decision on the functions (which will always be true).

Now, if we inspect the IR generated by these two different approaches, we’ll clearly see the difference between the tracing and scripting approaches:

# 1) Graph from the scripting approach
graph(%x : Dynamic) {
  %16 : int = prim::Constant[value=2]()
  %10 : int = prim::Constant[value=1]()
  %7 : int = prim::Constant[value=1]()
  %8 : int = prim::Constant[value=1]()
  %9 : int = aten::eq(%7, %8)
  %ret : Dynamic = prim::If(%9)
    block0() {
      %11 : int[] = prim::ListConstruct(%10)
      %12 : int = prim::Constant[value=6]()
      %13 : int = prim::Constant[value=0]()
      %14 : int[] = prim::Constant[value=[0, -1]]()
      %ret.2 : Dynamic = aten::rand(%11, %12, %13, %14)
      -> (%ret.2)
    }
    block1() {
      %17 : int[] = prim::ListConstruct(%16)
      %18 : int = prim::Constant[value=6]()
      %19 : int = prim::Constant[value=0]()
      %20 : int[] = prim::Constant[value=[0, -1]]()
      %ret.3 : Dynamic = aten::rand(%17, %18, %19, %20)
      -> (%ret.3)
    }
  return (%ret);
}

# 2) Graph from the tracing approach
graph(%0 : Long()) {
  %7 : int = prim::Constant[value=1]()
  %8 : int[] = prim::ListConstruct(%7)
  %9 : int = prim::Constant[value=6]()
  %10 : int = prim::Constant[value=0]()
  %11 : int[] = prim::Constant[value=[0, -1]]()
  %12 : Float(1) = aten::rand(%8, %9, %10, %11)
  return (%12);
}

​

As we can see, the IR is very similar to the LLVM IR, note that in the tracing approach, the trace recorded contains only one path from the code, the truth path, while in the scripting we have both branching alternatives. However, even in scripting, the always false branch can be optimized and removed with a dead code elimination transform pass.

PyTorch JIT has a lot of transformation passes that are used to do loop unrolling, dead code elimination, etc. You can find these passes here. Not that conversion to other formats such as ONNX can be implemented as a pass on top of this intermediate representation (IR), which is quite convenient.

Tracing the ResNet

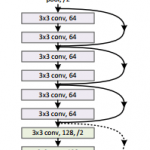
Now, before implementing the Script Module in NodeJS, let’s first trace a ResNet network using PyTorch (using just Python):

traced_net = torch.jit.trace(torchvision.models.resnet18(),
                             torch.rand(1, 3, 224, 224))
traced_net.save("resnet18_trace.pt")

As you can see from the code above, we just have to provide a tensor example (in this case a batch of a single image with 3 channels and size 224×224. After that we just save the traced network into a file called resnet18_trace.pt.

Now we’re ready to implement the Script Module in NodeJS in order to load this file that was traced.

Wrapping the Script Module

This is now the implementation of the Script Module in NodeJS:

// Class constructor
ScriptModule::ScriptModule(const std::string filename) {
  // Load the traced network from the file
  this->mModule = torch::jit::load(filename);
}

// JavaScript object creation
NAN_METHOD(ScriptModule::New) {
  if (info.IsConstructCall()) {
    // Get the filename parameter
    v8::String::Utf8Value param_filename(info[0]->ToString());
    const std::string filename = std::string(*param_filename);

    // Create a new script module using that file name
    ScriptModule *obj = new ScriptModule(filename);
    obj->Wrap(info.This());
    info.GetReturnValue().Set(info.This());
  } else {
    v8::Local<v8::Function> cons = Nan::New(constructor);
    info.GetReturnValue().Set(Nan::NewInstance(cons).ToLocalChecked());
  }
}

As you can see from the code above, we’re just creating a class that will call the torch::jit::load function passing a file name of the traced network. We also have the implementation of the JavaScript object, where we convert parameters to C++ types and then create a new instance of the torchjs::ScriptModule.

The wrapping of the forward pass is also quite straightforward:

NAN_METHOD(ScriptModule::forward) {
  ScriptModule* script_module = ObjectWrap::Unwrap<ScriptModule>(info.Holder());
  Nan::MaybeLocal<v8::Object> maybe = Nan::To<v8::Object>(info[0]);

  Tensor *tensor =
    Nan::ObjectWrap::Unwrap<Tensor>(maybe.ToLocalChecked());
  
  torch::Tensor torch_tensor = tensor->getTensor();
  torch::Tensor output = script_module->mModule->forward({torch_tensor}).toTensor();

  auto newinst = Tensor::NewInstance();
  Tensor* obj = Nan::ObjectWrap::Unwrap<Tensor>(newinst);
  obj->setTensor(output);
  info.GetReturnValue().Set(newinst);
}

As you can see, in this code, we just receive a tensor as an argument, we get the internal torch::Tensor from it and then call the forward method from the script module, we wrap the output on a new torchjs::Tensor and then return it.

And that’s it, we’re ready to use our built module in native NodeJS as in the example below:

var torchjs = require("./build/Release/torchjs");
var script_module = new torchjs.ScriptModule("resnet18_trace.pt");
var data = torchjs.ones([1, 3, 224, 224], false);
var output = script_module.forward(data);

I hope you enjoyed ! Libtorch opens the door for the tight integration of PyTorch in many different languages and frameworks, which is quite exciting and a huge step towards the direction of production deployment code.

– Christian S. Perone

Cite this article as: Christian S. Perone, "PyTorch 1.0 tracing JIT and LibTorch C++ API to integrate PyTorch into NodeJS," in Terra Incognita, 02/10/2018, https://blog.christianperone.com/2018/10/pytorch-1-0-tracing-jit-and-libtorch-c-api-to-integrate-pytorch-into-nodejs/.
CPP, Programming

Nanopipe: connecting the modern babel

logored

For more information, see official documentation site or the official Github repository.

arch

Hello everyone, I just released the Nanopipe project. Nanopipe is a library that allows you to connect different message queue systems (but not limited to) together. Nanopipe was built to avoid the glue code between different types of communication protocols/channels that is very common nowadays. An example of this is: you have an application that is listening for messages on an AMQP broker (ie. RabbitMQ) but you also have a Redis pub/sub source of messages and also a MQTT source from a weird IoT device you may have. Using Nanopipe, you can connect both MQTT and Redis to RabbitMQ without doing any glue code for that. You can also build any kind of complex connection scheme using Nanopipe.

arch2

c, Python, Uncategorized

Hacking into Python objects internals

You know, Python represents every object using the low-level C API PyObject (or PyVarObject for variable-size objects) structure, so, concretely, you can cast any Python object pointer to this type; this inheritance is built by hand, every new object must have a leading macro called PyObject_HEAD which defines the PyObject header for the object. The PyObject structure is declared in Include/object.h as:

[enlighter lang=”c”]
typedef struct _object {
PyObject_HEAD
} PyObject;
[/enlighter]

and the PyObject_HEAD macro is defined as:

[enlighter lang=”c”]
#define PyObject_HEAD                   \
_PyObject_HEAD_EXTRA                \
Py_ssize_t ob_refcnt;               \
struct _typeobject *ob_type;
[/enlighter]

… with two fields (forget the _PyObject_HEAD_EXTRA, it’s only used for a tracing debug feature) called ob_refcnt and ob_type, representing the reference counting for the object and the type of the object. I know you can use sys.getrefcount to get the reference counting of an object, but hacking the object memory using ctypes is by far more powerful, since you can get the contents of any field of the object (in cases where you don’t have a native API for that), I’ll show more examples later, but lets focus on the reference counting field of the object.

Getting the reference count (ob_refcnt)

So, in Python, we have the built-in function id(), this function returns the identity of the object, but, looking at its definition on CPython implementation, you’ll notice that id() returns the memory address of the object, see the source in Python/bltinmodule.c:

[enlighter lang=”c”]
static PyObject *
builtin_id(PyObject *self, PyObject *v)
{
return PyLong_FromVoidPtr(v);
}
[/enlighter]

… the function PyLong_FromVoidPtr returns a Python long object from a void pointer. So, in CPython, this value is the address of the object in the memory as shown below:

[enlighter lang=”python”]
>>> value = 666
>>> hex(id(value))
‘0x8998e50’ # memory address of the ‘value’ object
[/enlighter]

Now that we have the memory address of the object, we can use the Python ctypes module to get the reference counting by accessing the attribute ob_refcnt, here is the code needed to do that:

[enlighter lang=”python”]
>>> value = 666
>>> value_address = id(value)
>>>
>>> ob_refcnt = ctypes.c_long.from_address(value_address)
>>> ob_refcnt
c_long(1)
[/enlighter]

What I’m doing here is getting the integer value from the ob_refcnt attribute of the PyObject in memory.  Let’s add a new reference for the object ‘value’ we created, and then check the reference count again:

[enlighter lang=”python”]
>>> value_ref = value
>>> id(value_ref) == id(value)
True
>>> ob_refcnt
c_long(2)
[/enlighter]

Note that the reference counting was increased by 1 due to the new reference variable called ‘value_ref’.

Interned strings state (ob_sstate)

Now, getting the reference count wasn’t even funny, we already had the sys.getrefcount API for that, but what about the interned state of the strings ? In order to avoid the creation of different allocations for the same string (and to speed comparisons), Python uses a dictionary that works like a “cache” for strings, this dictionary is defined in Objects/stringobject.c:

[enlighter lang=”c”]

/* This dictionary holds all interned strings.  Note that references to
strings in this dictionary are *not* counted in the string’s ob_refcnt.
When the interned string reaches a refcnt of 0 the string deallocation
function will delete the reference from this dictionary.

Another way to look at this is that to say that the actual reference
count of a string is:  s->ob_refcnt + (s->ob_sstate?2:0)
*/
static PyObject *interned;
[/enlighter]

I also copied here the comment about the dictionary, because is interesting to note that the strings in the dictionary aren’t counted in the string’s ob_refcnt.

So, the interned state of a string object is hold in the attribute ob_sstate of the string object, let’s see the definition of the Python string object:

[enlighter lang=”c”]

typedef struct {
PyObject_VAR_HEAD
long ob_shash;
int ob_sstate;
char ob_sval[1];

/* Invariants:
*     ob_sval contains space for ‘ob_size+1’ elements.
*     ob_sval[ob_size] == 0.
*     ob_shash is the hash of the string or -1 if not computed yet.
*     ob_sstate != 0 iff the string object is in stringobject.c’s
*       ‘interned’ dictionary; in this case the two references
*       from ‘interned’ to this object are *not counted* in ob_refcnt.
*/
} PyStringObject;
[/enlighter]

As you can note, strings objects inherit from the PyObject_VAR_HEAD macro, which defines another header attribute, let’s see the definition to get the complete idea of the structure:

[enlighter lang=”c”]
#define PyObject_VAR_HEAD               \
PyObject_HEAD                       \
Py_ssize_t ob_size; /* Number of items in variable part */
[/enlighter]

The PyObject_VAR_HEAD macro adds another field called ob_size, which is the number of items on the variable part of the Python object (i.e. the number of items on a list object). So, before getting to the ob_sstate field, we need to shift our offset to skip the fields ob_refcnt (long), ob_type (void*) (from PyObject_HEAD), the field ob_size (long) (from PyObject_VAR_HEAD) and the field ob_shash (long) from the PyStringObject. Concretely, we need to skip this offset (3 fields with size long and one field with size void*) of bytes:

[enlighter lang=”python”]
>>> ob_sstate_offset = ctypes.sizeof(ctypes.c_long)*3 + ctypes.sizeof(ctypes.c_voidp)
>>> ob_sstate_offset
16
[/enlighter]

Now, let’s prepare two cases, one that we know that isn’t interned and another that is surely interned, then we’ll force the interned state of the other non-interned string to check the result of the ob_sstate attribute:

[enlighter lang=”python”]
>>> a = “lero”
>>> b = “”.join([“l”, “e”, “r”, “o”])
>>> ctypes.c_long.from_address(id(a) + ob_sstate_offset)
c_long(1)
>>> ctypes.c_long.from_address(id(b) + ob_sstate_offset)
c_long(0)
>>> ctypes.c_long.from_address(id(intern(b)) + ob_sstate_offset)
c_long(1)
[/enlighter]

Note that the interned state for the object “a” is 1 and for the object “b” is 0. After forcing the interned state of the variable “b”, we can see that the field ob_sstate has changed to 1.

Changing internal states (evil mode)

Now, let’s suppose we want to change some internal state of a Python object through the interpreter. Let’s try to change the value of an int object. Int objects are defined in Include/intobject.h:

[enlighter lang=”c”]
typedef struct {
PyObject_HEAD
long ob_ival;
} PyIntObject;
[/enlighter]

As you can see, the internal value of an int is stored in the field ob_ival, to change it, we just need to skip the ob_refcnt (long) and the ob_type (void*) from the PyObject_HEAD:

[enlighter lang=”python”]
>>> value = 666
>>> ob_ival_offset = ctypes.sizeof(ctypes.c_long) + ctypes.sizeof(ctypes.c_voidp)
>>> ob_ival = ctypes.c_int.from_address(id(value)+ob_ival_offset)
>>> ob_ival
c_long(666)
>>> ob_ival.value = 8
>>> value
8
[/enlighter]

And that is it, we have changed the value of the int value directly in the memory.

I hope you liked it, you can play with lots of other Python objects like lists and dicts, note that this method is just intended to show how the Python objects are structured in the memory and how you can change them using the native API, but obviously, you’re not supposed to use this to change the value of ints lol.

Update 11/29/11: you’re not supposed to do such things on your production code or something like that, in this post I’m doing lazy assumptions about arch details like sizes of primitives, etc. Be warned.

Cite this article as: Christian S. Perone, "Hacking into Python objects internals," in Terra Incognita, 23/11/2011, https://blog.christianperone.com/2011/11/hacking-into-python-objects-internals/.
CPP

C++11 user-defined literals and some constructions

I was taking a look at the proposal N2765 (user-defined literals) already implemented on the development snapshots of the GCC 4.7 and I was thinking in how user-defined literals can be used to create some interesting and sometimes strange constructions.

Introduction to user-defined literals

C++03 has some literals, like the “f” in “12.2f” that converts the double value to float. The problem is that these literals aren’t very flexible since they’re pretty fixed, so you can’t change them or create new ones. To overcome this situation, C++11 introduced the concept of “user-defined literals” that will give to the user, the ability to create new custom literal modifiers. The new user-defined literals can create either built-in types (e.g. int) or user-define types (e.g. classes), and the fact that they could be very useful is an effect that they can return objects instead of only primitives.

The new syntax for the user-defined literals is:

[enlighter lang=”C++”]
OutputType operator “” _suffix(const char *literal_string);
[/enlighter]

… in the case of a literal string. The OutputType is anything you want (object or primitive), the “_suffix” is the name of the literal modifier, isn’t required to use the underline in front of it, but if you don’t use you’ll get some warnings telling you that suffixes not preceded by the underline are reserved for future standardization.

Examples

Kmh to Mph converter

[enlighter lang=”C++” escaped=”true” lines=”1000″]
// stupid converter class
class Converter
{
public:
Converter(double kmph) : m_kmph(kmph) {};
~Converter() {};

double to_mph(void)
{ return m_kmph / 1.609344; }

private:
double m_kmph;
};

// user-defined literal
Converter operator “” kmph(long double kmph)
{ return Converter(kmph); }

int main(void)
{
std::cout << “Converter: ” << (80kmph).to_mph() << std::endl;
// note that I’m using parenthesis in order to
// be able to call the ‘to_mph’ method
return 0;
}
[/ccb]

Note that the literal for for numeric types should be either long double (for floating point literals) or unsigned long long (for integral literals). There is no signed type, because a signed literal is parsed as an expression with a sign as unary prefix and the unsigned number part.

std::string literal

[enlighter lang=”C++” escaped=”true” lines=”1000″]
std::string operator “” s (const char* p, size_t n)
{ return std::string(p,n); }

int main(void)
{
std::cout << "convert me to a string"s.length() << std::endl; // here you don't need the parenthesis, note that the // c-string was automagically converted to std::string return 0; } [/ccb]

system() call

[enlighter lang=”C++” escaped=”true” lines=”1000″]
int operator “” ex(const char *cmd, size_t num_chars)
{ return system(cmd); }

int main(void)
{
“ls -lah”ex;
return 0;
}
[/ccb]

alias and std::map

[enlighter lang=”C++” escaped=”true” lines=”1000″]
typedef std::map MyMap;
MyMap create_map()
{
MyMap m;
m[“lol”] = 7;
return m;
}
auto m = create_map();

int& operator “” m(const char *key, size_t length)
{ return m[key]; }

int main(void)
{
std::cout << "lol"m << std::endl; // 7 "lol"m = 2; std::cout << "lol"m << std::endl; // 2 return 0; } [/ccb]

References

Wikipedia :: C++11 (User-defined literals)

Proposal N2765

Genetic Algorithms, Pyevolve, Python

The future can be written in RPython now

Following the recent article arguing why PyPy is the future of Python, I must say, PyPy is not the future of Python, is the present. When I have tested it last time (PyPy-c 1.1.0) with Pyevolve into the optimization of a simple Sphere function, it was at least 2x slower than Unladen Swallow Q2, but in that time, PyPy was not able to JIT. Now, with this new release of PyPy and the JIT’ing support, the scenario has changed.

PyPy has evolved a lot (actually, you can see this evolution here), a nice work was done on the GC system, saving (when compared to CPython) 8 bytes per object allocated, which is very interesting for applications that makes heavy use of object allocation (GP system are a strong example of this, since when they are implemented on object oriented languages, each syntax tree node is an object). Efforts are also being done to improve support for CPython extensions (written in C/C++), one of them is a little tricky: the use of RPyC, to proxy through TCP the remote calls to CPython; but the other seems by far more effective, which is the creation of the CPyExt subsystem. By using CPyExt, all you need is to have your CPython API functions implemented in CPyExt, a lot of people is working on this right now and you can do it too, it’s a long road to have a good API coverage, but when you think about advantages, this road becomes small.

In order to benchmark CPython, Jython, CPython+Psyco, Unladen Swallow and PyPy, I’ve used the Rastrigin function optimization (an example of that implementation is here in the Example 7 of Pyevolve 0.6rc1):

f(x) = 10n + \sum_{i=1}^{n}{x_{i}^{2}} -10\cos(2\pi x_{i})

Due to its large search space and number of local minima, Rastrigin function is often used to measure the performance of Genetic Algorithms. Rastrigin function has a global minimum at x=0 where the f(x) = 0; in order to increase the search space and required resources, I’ve used 40 variables (n=40)  and 10k generations.

Here are the information about versions used in this benchmark:

No warmup was performed in JVM or in PyPy. PyPy translator was executed using the “-Ojit” option in order to get the JIT version of the Python interpreter. The JVM was executed using the server mode, I’ve tested the client and server mode for Sun JVM and IcedTea6, the best results were observed from the server mode using Sun JVM, however when I’ve compared the client mode of IcedTea6 with the client mode of Sun JVM, the best results observed were from IcedTea6 (the same as using server mode in IcedTea6). Unladen Swallow was compiled using the project wiki instructions for building an optimized binary.

The machine used was an Intel(R) Core(TM) 2 Duo E4500 (2×2.20Ghz) with 2GB of RAM.

The result of the benchmark (measured using wall time) in seconds for each setup (these results are the best of 3 sequential runs):

As you can see, PyPy with JIT got a speedup of 2.57x when compared to CPython 2.6.5 and 2.0x  faster than Unladen Swallow current trunk.

PyPy is not only the future of Python, but is becoming the present right now. PyPy will not bring us only an implementation of Python in Python (which in itself is the valuable result of great efforts), but also will bring the performance back (which many doubted at the beginning, wondering how could it be possible for an implementation of Python in Python be faster than an implementation in C ? And here is where the translation and JIT magic enters). When the time comes that Python interpreter can be entire written in a high level language (actually almost the same language, which is really weird), Python community can put their focus on improving the language itself instead of spending time solving the complexity of the lower level languages, is this not the great point of those efforts ?

By the way, just to note, PyPy isn’t only a translator for the Python interpreter written in RPython, it’s a translator of RPython, what means that PyPy isn’t only the future of Python, but probably, the future of many interpreters.

c, LLVM

A method for JIT’ing algorithms and data structures with LLVM

llvm_dragon

Hello folks, I always post about Python and EvoComp (Pyevolve), but this time it’s about C, LLVM, search algorithms and data structures. This post describes the efforts to implement an idea: to JIT (verb) algorithms and the data structures used by them, together.

AVL Tree Intro

Here is a short intro to AVL Trees from Wikipedia:

In computer science, an AVL tree is a self-balancing binary search tree, and it is the first such data structure to be invented. In an AVL tree, the heights of the two child subtrees of any node differ by at most one; therefore, it is also said to be height-balanced. Lookup, insertion, and deletion all take O(log n) time in both the average and worst cases, where n is the number of nodes in the tree prior to the operation. Insertions and deletions may require the tree to be rebalanced by one or more tree rotations.

The problem and the idea

When we have a data structure and algorithms to handle (insert, remove and lookup) that structure, the native code of our algorithm is usually full of overhead; for example, in an AVL Tree (Balanced Binary Tree), the overhead appear in: checking if we really have a left or right node while traversing the nodes for lookups, accessing nodes inside nodes, etc. This overhead creates unnecessary assembly operations which in turn, creates native code overhead, even when the compiler optimize it. This overhead directly impacts on the performance of our algorithm (this traditional approach, of course, give us a very flexible structure and the complexity (not Big-O) is easy to handle, but we pay for it: performance loss).

(more…)

Python

Announce: python-gstringc 1.0

Last week I’ve done the ctype wrapper of Glib GString, but the performance issues when compared with cStringIO or StringIO was very poor, due to overhead of the ctypes calls. So I’ve written a new C extension for Python, the source-code (for linux) and install packages (for win32) are available at the project site. Here is some performance comparisons:

gstring

gstring_linux

Those tests were done to test string concatenation (append) of the three modules. You can find more about the tests and performance in the project site.

I hope you enjoy =)

I'm starting a new course "Machine Learning: Foundations and Engineering" for 2024.