Tag: pytorch

Machine Learning, Programming

Tutorial on using LLVM to JIT PyTorch fx graphs to native code (x86/arm/risc-v/wasm) (Part I – Scalars)

In 2009 I started playing with LLVM for some projects (data structure jit, for genetic programming, jit for tensorflow graphs, etc), and in these projects I realized how powerful LLVM design was at the time (and still is): using an elegant IR (intermediate representation) with an user-facing API and modularized front-ends and backends with plenty of transformation and optimization passes. Nowadays, LLVM is the main engine behind many compilers and JIT compilation and where most of the modern developments in compilers is happening.

On a related note, PyTorch is doing an amazing job of exposing more of the torch tracing system and its IR and graphs, not to mention their work on recent fusers and TorchDynamo. In this context, I was doing a small test to re-implement Shine, but using ATen ops for tensors and realized that there were not many educative tutorials on how to use LLVM to JIT PyTorch graphs, so this is a quick series (if time helps there will be more following posts) on how to use LLVM (python bindings) to go from PyTorch graphs (as traced by torch.fx) to LLVM IR and native code.

Detour – PyTorch NNC (Neural Net Compiler)

PyTorch itself also has a compiler that uses LLVM to generate native code for subgraphs that the fuser identifies. This is also called NNC (Neural Net Compiler) or Tensor Expressions (TE) as well, you can read more about them here in the C++ API tutorial. One thing to note though is that default binaries you get from PyTorch do not come linked to the LLVM libraries, so you need to compile it by yourself and enable LLVM backend, otherwise it won’t use LLVM to do the JIT compilation/optimization of the subgraphs. Let’s take a look at it first before starting our tutorial

(more…)

Machine Learning

PyData Montreal slides for the talk: PyTorch under the hood

These are the slides of the talk I presented on PyData Montreal on Feb 25th. It was a pleasure to meet you all ! Thanks a lot to Maria and Alexander for the invitation !

Cite this article as: Christian S. Perone, "PyData Montreal slides for the talk: PyTorch under the hood," in Terra Incognita, 26/02/2019, https://blog.christianperone.com/2019/02/pydata-montreal-slides-for-the-talk-pytorch-under-the-hood/.
Python

Numpy dispatcher: when Numpy becomes a protocol for an ecosystem

Introduction

Not a lot of people working with the Python scientific ecosystem are aware of the NEP 18 (dispatch mechanism for NumPy’s high-level array functions). Given the importance of this protocol, I decided to write this short introduction to the new dispatcher that will certainly bring a lot of benefits for the Python scientific ecosystem.

If you used PyTorch, TensorFlow, Dask, etc, you certainly noticed the similarity of their API contracts with Numpy. And it’s not by accident, Numpy’s API is one of the most fundamental and widely-used APIs for scientific computing. Numpy is so pervasive, that it ceased to be only an API and it is becoming more a protocol or an API specification.

(more…)

Machine Learning, Python

Randomized prior functions in PyTorch

Trained MLP with 2 hidden layers and a sine prior.

I was experimenting with the approach described in “Randomized Prior Functions for Deep Reinforcement Learning” by Ian Osband et al. at NPS 2018, where they devised a very simple and practical method for uncertainty using bootstrap and randomized priors and decided to share the PyTorch code.

I really like bootstrap approaches, and in my opinion, they are usually the easiest methods to implement and provide very good posterior approximation with deep connections to Bayesian approaches, without having to deal with variational inference. They actually show in the paper that in the linear case, the method provides a Bayes posterior.

The main idea of the method is to have bootstrap to provide a non-parametric data perturbation together with randomized priors, which are nothing more than just random initialized networks.

$$Q_{\theta_k}(x) = f_{\theta_k}(x) + p_k(x)$$

The final model \(Q_{\theta_k}(x)\) will be the k model of the ensemble that will fit the function \(f_{\theta_k}(x)\) with an untrained prior \(p_k(x)\).

Let’s go to the code. The first class is a simple MLP with 2 hidden layers and Glorot initialization :

class MLP(nn.Module):
    def __init__(self):
        super().__init__()
        self.l1 = nn.Linear(1, 20)
        self.l2 = nn.Linear(20, 20)
        self.l3 = nn.Linear(20, 1)
        
        nn.init.xavier_uniform_(self.l1.weight)
        nn.init.xavier_uniform_(self.l2.weight)
        nn.init.xavier_uniform_(self.l3.weight)

    def forward(self, inputs):
        x = self.l1(inputs)
        x = nn.functional.selu(x)
        x = self.l2(x)
        x = nn.functional.selu(x)
        x = self.l3(x)
        return x

Then later we define a class that will take the model and the prior to produce the final model result:

class ModelWithPrior(nn.Module):
    def __init__(self,
                 base_model : nn.Module,
                 prior_model : nn.Module,
                 prior_scale : float = 1.0):
        super().__init__()
        self.base_model = base_model
        self.prior_model = prior_model
        self.prior_scale = prior_scale

    def forward(self, inputs):
        with torch.no_grad():
            prior_out = self.prior_model(inputs)
            prior_out = prior_out.detach()
        model_out = self.base_model(inputs)
        return model_out + (self.prior_scale * prior_out)

And it’s basically that ! As you can see, it’s a very simple method, in the second part we just created a custom forward() to avoid computing/accumulating gradients for the prior network and them summing (after scaling) it with the model prediction.

To train it, you just have to use different bootstraps for each ensemble model, like in the code below:

def train_model(x_train, y_train, base_model, prior_model):
    model = ModelWithPrior(base_model, prior_model, 1.0)
    loss_fn = nn.MSELoss()
    optimizer = torch.optim.Adam(model.parameters(), lr=0.05)
    
    for epoch in range(100):
        model.train()
        preds = model(x_train)
        loss = loss_fn(preds, y_train)

        optimizer.zero_grad()
        loss.backward()
        optimizer.step()
            
    return model

and using a sampler with replacement (bootstrap) as in:

dataset = TensorDataset(...)
bootstrap_sampler = RandomSampler(dataset, True, len(dataset))
train_dataloader = DataLoader(dataset,
                              batch_size=len(dataset),
                              sampler=bootstrap_sampler)

In this case, I used the same small dataset used in the original paper:

After training it with a simple MLP prior as well, the results for the uncertainty are shown below:

Trained model with an MLP prior, used an ensemble of 50 models.

If we look at just the priors, we will see the variation of the untrained networks:

We can also visualize the individual model predictions showing their variability due to different initializations as well as the bootstrap noise:

Plot showing each individual model prediction and true data in red.

Now, what is also quite interesting, is that we can change the prior to let’s say a fixed sine:

class SinPrior(nn.Module):
    def forward(self, input):
        return torch.sin(3 * input)

Then, when we train the same MLP model but this time using the sine prior, we can see how it affects the final prediction and uncertainty bounds:

If we show each individual model, we can see the effect of the prior contribution to each individual model:

Plot showing each individual model of the ensemble trained with a sine prior.

I hope you liked, these are quite amazing results for a simple method that at least pass the linear “sanity check”. I’ll explore some pre-trained networks in place of the prior to see the different effects on predictions, it’s a very interesting way to add some simple priors.

Cite this article as: Christian S. Perone, "Randomized prior functions in PyTorch," in Terra Incognita, 24/03/2019, https://blog.christianperone.com/2019/03/randomized-prior-functions-in-pytorch/.
Machine Learning, Python

PyTorch 1.0 tracing JIT and LibTorch C++ API to integrate PyTorch into NodeJS

Update 28 Feb 2019: I added a new blog post with a slide deck containing the presentation I did for PyData Montreal.

Today, at the PyTorch Developer Conference, the PyTorch team announced the plans and the release of the PyTorch 1.0 preview with many nice features such as a JIT for model graphs (with and without tracing) as well as the LibTorch, the PyTorch C++ API, one of the most important release announcement made today in my opinion.

Given the huge interest in understanding how this new API works, I decided to write this article showing an example of many opportunities that are now open after the release of the PyTorch C++ API. In this post, I’ll integrate PyTorch inference into native NodeJS using NodeJS C++ add-ons, just as an example of integration between different frameworks/languages that are now possible using the C++ API.

Below you can see the final result:

As you can see, the integration is seamless and I could use a traced ResNet as the computational graph model and feed any tensor to it to get the output predictions.

Introduction

Simply put, the libtorch is a library version of the PyTorch. It contains the underlying foundation that is used by PyTorch, such as the ATen (the tensor library), which contains all the tensor operations and methods. Libtorch also contains the autograd, which is the component that adds the automatic differentiation to the ATen tensors.

A word of caution for those who are starting now is to be careful with the use of the tensors that can be created both from ATen and autograd, do not mix them, the ATen will return the plain tensors (when you create them using the at namespace) while the autograd functions (from the torch namespace) will return Variable, by adding its automatic differentiation mechanism.

For a more extensive tutorial on how PyTorch internals work, please take a look on my previous tutorial on the PyTorch internal architecture.

Libtorch can be downloaded from the Pytorch website and it is only available as a preview for a while. You can also find the documentation in this site, which is mostly a Doxygen rendered documentation. I found the library pretty stable, and it makes sense because it is actually exposing the stable foundations of PyTorch, however, there are some issues with headers and some minor problems concerning the library organization that you might find while starting working with it (that will hopefully be fixed soon).

For NodeJS, I’ll use the Native Abstractions library (nan) which is the most recommended library (actually is basically a header-only library) to create NodeJS C++ add-ons and the cmake-js, because libtorch already provide the cmake files that make our building process much easier. However, the focus here will be on the C++ code and not on the building process.

The flow for the development, tracing, serializing and loading the model can be seen in the figure on the left side.

It starts with the development process and tracing being done in PyTorch (Python domain) and then the loading and inference on the C++ domain (in our case in NodeJS add-on).


Wrapping the Tensor

In NodeJS, to create an object as a first-class citizen of the JavaScript world, you need to inherit from the ObjectWrap class, which will be responsible for wrapping a C++ component.

#ifndef TENSOR_H
#define TENSOR_H

#include <nan.h>
#include <torch/torch.h>

namespace torchjs {

class Tensor : public Nan::ObjectWrap {
 public:
  static NAN_MODULE_INIT(Init);

  void setTensor(at::Tensor tensor) {
    this->mTensor = tensor;
  }

  torch::Tensor getTensor() {
    return this->mTensor;
  }

  static v8::Local<v8::Object> NewInstance();

 private:
  explicit Tensor();
  ~Tensor();

  static NAN_METHOD(New);
  static NAN_METHOD(toString);
  static Nan::Persistent<v8::Function> constructor;

 private:
  torch::Tensor mTensor;

};

}  // namespace torchjs

#endif

As you can see, most of the code for the definition of our Tensor class is just boilerplate. The key point here is that the torchjs::Tensor will wrap a torch::Tensor and we added two special public methods (setTensor and getTensor) to set and get this internal torch tensor.

I won’t show all the implementation details because most parts of it are NodeJS boilerplate code to construct the object, etc. I’ll focus on the parts that touch the libtorch API, like in the code below where we are creating a small textual representation of the tensor to show on JavaScript (toString method):

NAN_METHOD(Tensor::toString) {
  Tensor* obj = ObjectWrap::Unwrap<Tensor>(info.Holder());
  std::stringstream ss;

  at::IntList sizes = obj->mTensor.sizes();
  ss << "Tensor[Type=" << obj->mTensor.type() << ", ";
  ss << "Size=" << sizes << std::endl;

  info.GetReturnValue().Set(Nan::New(ss.str()).ToLocalChecked());
}

What we are doing in the code above, is just getting the internal tensor object from the wrapped object by unwrapping it. After that, we build a string representation with the tensor size (each dimension sizes) and its type (float, etc).

Wrapping Tensor-creation operations

Let’s create now a wrapper code for the torch::ones function which is responsible for creating a tensor of any defined shape filled with constant 1’s.

NAN_METHOD(ones) {
  // Sanity checking of the arguments
  if (info.Length() < 2)
    return Nan::ThrowError(Nan::New("Wrong number of arguments").ToLocalChecked());

  if (!info[0]->IsArray() || !info[1]->IsBoolean())
    return Nan::ThrowError(Nan::New("Wrong argument types").ToLocalChecked());

  // Retrieving parameters (require_grad and tensor shape)
  const bool require_grad = info[1]->BooleanValue();
  const v8::Local<v8::Array> array = info[0].As<v8::Array>();
  const uint32_t length = array->Length();

  // Convert from v8::Array to std::vector
  std::vector<long long> dims;
  for(int i=0; i<length; i++)
  {
    v8::Local<v8::Value> v;
    int d = array->Get(i)->NumberValue();
    dims.push_back(d);
  }

  // Call the libtorch and create a new torchjs::Tensor object
  // wrapping the new torch::Tensor that was created by torch::ones
  at::Tensor v = torch::ones(dims, torch::requires_grad(require_grad));
  auto newinst = Tensor::NewInstance();
  Tensor* obj = Nan::ObjectWrap::Unwrap<Tensor>(newinst);
  obj->setTensor(v);

  info.GetReturnValue().Set(newinst);
}

So, let’s go through this code. We are first checking the arguments of the function. For this function, we’re expecting a tuple (a JavaScript array) for the tensor shape and a boolean indicating if we want to compute gradients or not for this tensor node. After that, we’re converting the parameters from the V8 JavaScript types into native C++ types. Soon as we have the required parameters, we then call the torch::ones function from the libtorch, this function will create a new tensor where we use a torchjs::Tensor class that we created earlier to wrap it.

And that’s it, we just exposed one torch operation that can be used as native JavaScript operation.

Intermezzo for the PyTorch JIT

The introduced PyTorch JIT revolves around the concept of the Torch Script. A Torch Script is a restricted subset of the Python language and comes with its own compiler and transform passes (optimizations, etc).

This script can be created in two different ways: by using a tracing JIT or by providing the script itself. In the tracing mode, your computational graph nodes will be visited and operations recorded to produce the final script, while the scripting is the mode where you provide this description of your model taking into account the restrictions of the Torch Script.

Note that if you have branching decisions on your code that depends on external factors or data, tracing won’t work as you expect because it will record that particular execution of the graph, hence the alternative option to provide the script. However, in most of the cases, the tracing is what we need.

To understand the differences, let’s take a look at the Intermediate Representation (IR) from the script module generated both by tracing and by scripting.

@torch.jit.script
def happy_function_script(x):
    ret = torch.rand(0)
    if True == True:
        ret = torch.rand(1)
    else:
        ret = torch.rand(2)
    return ret

def happy_function_trace(x):
    ret = torch.rand(0)
    if True == True:
        ret = torch.rand(1)
    else:
        ret = torch.rand(2)
    return ret

traced_fn = torch.jit.trace(happy_function_trace,
                            (torch.tensor(0),),
                            check_trace=False)

In the code above, we’re providing two functions, one is using the @torch.jit.script decorator, and it is the scripting way to create a Torch Script, while the second function is being used by the tracing function torch.jit.trace. Not that I intentionally added a “True == True” decision on the functions (which will always be true).

Now, if we inspect the IR generated by these two different approaches, we’ll clearly see the difference between the tracing and scripting approaches:

# 1) Graph from the scripting approach
graph(%x : Dynamic) {
  %16 : int = prim::Constant[value=2]()
  %10 : int = prim::Constant[value=1]()
  %7 : int = prim::Constant[value=1]()
  %8 : int = prim::Constant[value=1]()
  %9 : int = aten::eq(%7, %8)
  %ret : Dynamic = prim::If(%9)
    block0() {
      %11 : int[] = prim::ListConstruct(%10)
      %12 : int = prim::Constant[value=6]()
      %13 : int = prim::Constant[value=0]()
      %14 : int[] = prim::Constant[value=[0, -1]]()
      %ret.2 : Dynamic = aten::rand(%11, %12, %13, %14)
      -> (%ret.2)
    }
    block1() {
      %17 : int[] = prim::ListConstruct(%16)
      %18 : int = prim::Constant[value=6]()
      %19 : int = prim::Constant[value=0]()
      %20 : int[] = prim::Constant[value=[0, -1]]()
      %ret.3 : Dynamic = aten::rand(%17, %18, %19, %20)
      -> (%ret.3)
    }
  return (%ret);
}

# 2) Graph from the tracing approach
graph(%0 : Long()) {
  %7 : int = prim::Constant[value=1]()
  %8 : int[] = prim::ListConstruct(%7)
  %9 : int = prim::Constant[value=6]()
  %10 : int = prim::Constant[value=0]()
  %11 : int[] = prim::Constant[value=[0, -1]]()
  %12 : Float(1) = aten::rand(%8, %9, %10, %11)
  return (%12);
}

​

As we can see, the IR is very similar to the LLVM IR, note that in the tracing approach, the trace recorded contains only one path from the code, the truth path, while in the scripting we have both branching alternatives. However, even in scripting, the always false branch can be optimized and removed with a dead code elimination transform pass.

PyTorch JIT has a lot of transformation passes that are used to do loop unrolling, dead code elimination, etc. You can find these passes here. Not that conversion to other formats such as ONNX can be implemented as a pass on top of this intermediate representation (IR), which is quite convenient.

Tracing the ResNet

Now, before implementing the Script Module in NodeJS, let’s first trace a ResNet network using PyTorch (using just Python):

traced_net = torch.jit.trace(torchvision.models.resnet18(),
                             torch.rand(1, 3, 224, 224))
traced_net.save("resnet18_trace.pt")

As you can see from the code above, we just have to provide a tensor example (in this case a batch of a single image with 3 channels and size 224×224. After that we just save the traced network into a file called resnet18_trace.pt.

Now we’re ready to implement the Script Module in NodeJS in order to load this file that was traced.

Wrapping the Script Module

This is now the implementation of the Script Module in NodeJS:

// Class constructor
ScriptModule::ScriptModule(const std::string filename) {
  // Load the traced network from the file
  this->mModule = torch::jit::load(filename);
}

// JavaScript object creation
NAN_METHOD(ScriptModule::New) {
  if (info.IsConstructCall()) {
    // Get the filename parameter
    v8::String::Utf8Value param_filename(info[0]->ToString());
    const std::string filename = std::string(*param_filename);

    // Create a new script module using that file name
    ScriptModule *obj = new ScriptModule(filename);
    obj->Wrap(info.This());
    info.GetReturnValue().Set(info.This());
  } else {
    v8::Local<v8::Function> cons = Nan::New(constructor);
    info.GetReturnValue().Set(Nan::NewInstance(cons).ToLocalChecked());
  }
}

As you can see from the code above, we’re just creating a class that will call the torch::jit::load function passing a file name of the traced network. We also have the implementation of the JavaScript object, where we convert parameters to C++ types and then create a new instance of the torchjs::ScriptModule.

The wrapping of the forward pass is also quite straightforward:

NAN_METHOD(ScriptModule::forward) {
  ScriptModule* script_module = ObjectWrap::Unwrap<ScriptModule>(info.Holder());
  Nan::MaybeLocal<v8::Object> maybe = Nan::To<v8::Object>(info[0]);

  Tensor *tensor =
    Nan::ObjectWrap::Unwrap<Tensor>(maybe.ToLocalChecked());
  
  torch::Tensor torch_tensor = tensor->getTensor();
  torch::Tensor output = script_module->mModule->forward({torch_tensor}).toTensor();

  auto newinst = Tensor::NewInstance();
  Tensor* obj = Nan::ObjectWrap::Unwrap<Tensor>(newinst);
  obj->setTensor(output);
  info.GetReturnValue().Set(newinst);
}

As you can see, in this code, we just receive a tensor as an argument, we get the internal torch::Tensor from it and then call the forward method from the script module, we wrap the output on a new torchjs::Tensor and then return it.

And that’s it, we’re ready to use our built module in native NodeJS as in the example below:

var torchjs = require("./build/Release/torchjs");
var script_module = new torchjs.ScriptModule("resnet18_trace.pt");
var data = torchjs.ones([1, 3, 224, 224], false);
var output = script_module.forward(data);

I hope you enjoyed ! Libtorch opens the door for the tight integration of PyTorch in many different languages and frameworks, which is quite exciting and a huge step towards the direction of production deployment code.

– Christian S. Perone

Cite this article as: Christian S. Perone, "PyTorch 1.0 tracing JIT and LibTorch C++ API to integrate PyTorch into NodeJS," in Terra Incognita, 02/10/2018, https://blog.christianperone.com/2018/10/pytorch-1-0-tracing-jit-and-libtorch-c-api-to-integrate-pytorch-into-nodejs/.
Machine Learning, Programming, Python

PyTorch – Internal Architecture Tour

Update 28 Feb 2019: I added a new blog post with a slide deck containing the presentation I did for PyData Montreal.

Introduction

This post is a tour around the PyTorch codebase, it is meant to be a guide for the architectural design of PyTorch and its internals. My main goal is to provide something useful for those who are interested in understanding what happens beyond the user-facing API and show something new beyond what was already covered in other tutorials.

Note: PyTorch build system uses code generation extensively so I won’t repeat here what was already described by others. If you’re interested in understanding how this works, please read the following tutorials:

Short intro to Python extension objects in C/C++

As you probably know, you can extend Python using C and C++ and develop what is called as “extension”. All the PyTorch heavy work is implemented in C/C++ instead of pure-Python. To define a new Python object type in C/C++, you define a structure like this one example below (which is the base for the autograd Variable class):

// Python object that backs torch.autograd.Variable
struct THPVariable {
    PyObject_HEAD
    torch::autograd::Variable cdata;
    PyObject* backward_hooks;
};

As you can see, there is a macro at the beginning of the definition, called PyObject_HEAD, this macro’s goal is the standardization of Python objects and will expand to another structure that contains a pointer to a type object (which defines initialization methods, allocators, etc) and also a field with a reference counter.

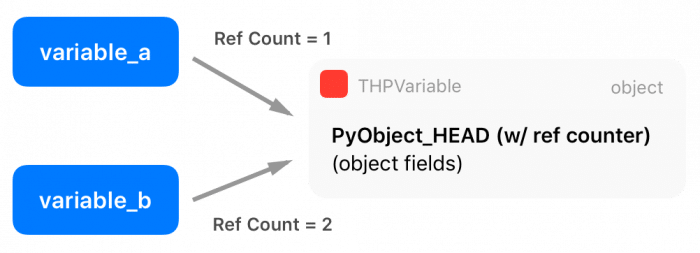
There are two extra macros in the Python API called Py_INCREF() and Py_DECREF(), which are used to increment and decrement the reference counter of Python objects. Multiple entities can borrow or own a reference to other objects (the reference counter is increased), and only when this reference counter reaches zero (when all references get destroyed), Python will automatically delete the memory from that object using its garbage collector.

You can read more about Python C/++ extensions here.

Funny fact: it is very common in many applications to use small integer numbers as indexing, counters, etc. For efficiency, the official CPython interpreter caches the integers from -5 up to 256. For that reason, the statement a = 200; b = 200; a is b will be True, while the statement a = 300; b = 300; a is b will be False.

Zero-copy PyTorch Tensor to Numpy and vice-versa

PyTorch has its own Tensor representation, which decouples PyTorch internal representation from external representations. However, as it is very common, especially when data is loaded from a variety of sources, to have Numpy arrays everywhere, therefore we really need to make conversions between Numpy and PyTorch tensors. For that reason, PyTorch provides two methods called from_numpy() and numpy(), that converts a Numpy array to a PyTorch array and vice-versa, respectively. If we look the code that is being called to convert a Numpy array into a PyTorch tensor, we can get more insights on the PyTorch’s internal representation:

at::Tensor tensor_from_numpy(PyObject* obj) {
  if (!PyArray_Check(obj)) {
    throw TypeError("expected np.ndarray (got %s)", Py_TYPE(obj)->tp_name);
  }

  auto array = (PyArrayObject*)obj;
  int ndim = PyArray_NDIM(array);
  auto sizes = to_aten_shape(ndim, PyArray_DIMS(array));
  auto strides = to_aten_shape(ndim, PyArray_STRIDES(array));
  // NumPy strides use bytes. Torch strides use element counts.
  auto element_size_in_bytes = PyArray_ITEMSIZE(array);
  for (auto& stride : strides) {
    stride /= element_size_in_bytes;
  }

  // (...) - omitted for brevity

  void* data_ptr = PyArray_DATA(array);
  auto& type = CPU(dtype_to_aten(PyArray_TYPE(array)));
  Py_INCREF(obj);
  return type.tensorFromBlob(data_ptr, sizes, strides, [obj](void* data) {
    AutoGIL gil;
    Py_DECREF(obj);
  });
}

(code from tensor_numpy.cpp)

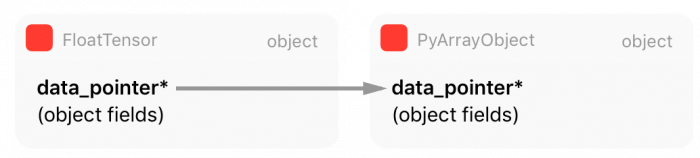
As you can see from this code, PyTorch is obtaining all information (array metadata) from Numpy representation and then creating its own. However, as you can note from the marked line 18, PyTorch is getting a pointer to the internal Numpy array raw data instead of copying it. This means that PyTorch will create a reference for this data, sharing the same memory region with the Numpy array object for the raw Tensor data.

There is also an important point here: when Numpy array object goes out of scope and get a zero reference count, it will be garbage collected and destroyed, that’s why there is an increment in the reference counting of the Numpy array object at line 20.

After this, PyTorch will create a new Tensor object from this Numpy data blob, and in the creation of this new Tensor it passes the borrowed memory data pointer, together with the memory size and strides as well as a function that will be used later by the Tensor Storage (we’ll discuss this in the next section) to release the data by decrementing the reference counting to the Numpy array object and let Python take care of this object life cycle.

The tensorFromBlob() method will create a new Tensor, but only after creating a new “Storage” for this Tensor. The storage is where the actual data pointer will be stored (and not in the Tensor structure itself). This takes us to the next section about Tensor Storages.

Tensor Storage

The actual raw data of the Tensor is not directly kept in the Tensor structure, but on another structure called Storage, which in turn is part of the Tensor structure.

As we saw in the previous code from tensor_from_numpy(), there is a call for tensorFromBlob() that will create a Tensor from the raw data blob. This last function will call another function called storageFromBlob() that will, in turn, create a storage for this data according to its type. In the case of a CPU float type, it will return a new CPUFloatStorage instance.

The CPUFloatStorage is basically a wrapper with utility functions around the actual storage structure called THFloatStorage that we show below:

typedef struct THStorage
{
    real *data;
    ptrdiff_t size;
    int refcount;
    char flag;
    THAllocator *allocator;
    void *allocatorContext;
    struct THStorage *view;
} THStorage;

(code from THStorage.h)

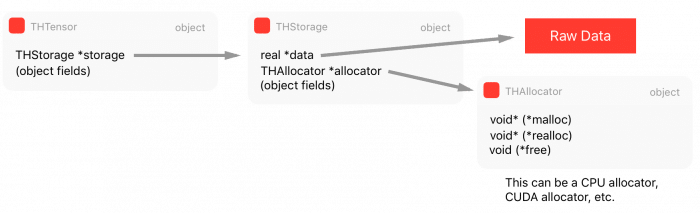
As you can see, the THStorage holds a pointer to the raw data, its size, flags and also an interesting field called allocator that we’ll soon discuss. It is also important to note that there is no metadata regarding on how to interpret the data inside the THStorage, this is due to the fact that the storage is “dumb” regarding of its contents and it is the Tensor responsibility to know how to “view” or interpret this data.

From this, you already probably realized that we can have multiple tensors pointing to the same storage but with different views of this data, and that’s why viewing a tensor with a different shape (but keeping the same number of elements) is so efficient. This Python code below shows that the data pointer in the storage is being shared after changing the way Tensor views its data:

>>> tensor_a = torch.ones((3, 3))
>>> tensor_b = tensor_a.view(9)
>>> tensor_a.storage().data_ptr() == tensor_b.storage().data_ptr()
True

As we can see in the example above, the data pointer on the storage of both Tensors are the same, but the Tensors represent a different interpretation of the storage data.

Now, as we saw in line 7 of the THFloatStorage structure, there is a pointer to a THAllocator structure there. And this is very important because it brings flexibility regarding the allocator that can be used to allocate the storage data. This structure is represented by the following code:

typedef struct THAllocator
{
  void* (*malloc)(void*, ptrdiff_t);
  void* (*realloc)(void*, void*, ptrdiff_t);
  void (*free)(void*, void*);
} THAllocator;

(code from THAllocator.h)

As you can see, there are three function pointer fields in this structure to define what an allocator means: a malloc, realloc and free. For CPU-allocated memory, these functions will, of course, relate to the traditional malloc/realloc/free POSIX functions, however, when we want a storage allocated on GPUs we’ll end up using the CUDA allocators such as the cudaMallocHost(), like we can see in the THCudaHostAllocator malloc function below:

static void *THCudaHostAllocator_malloc(void* ctx, ptrdiff_t size) {
  void* ptr;
  if (size < 0) THError("Invalid memory size: %ld", size);
  if (size == 0) return NULL;
  THCudaCheck(cudaMallocHost(&ptr, size));
  return ptr;
}

(code from THCAllocator.c)

You probably noticed a pattern in the repository organization, but it is important to keep in mind these conventions when navigating the repository, as summarized here (taken from the PyTorch lib readme):

  • TH = TorcH
  • THC = TorcH Cuda
  • THCS = TorcH Cuda Sparse
  • THCUNN = TorcH CUda Neural Network
  • THD = TorcH Distributed
  • THNN = TorcH Neural Network
  • THS = TorcH Sparse

This convention is also present in the function/class names and other objects, so it is important to always keep these patterns in mind. While you can find CPU allocators in the TH code, you’ll find CUDA allocators in the THC code.

Finally, we can see the composition of the main Tensor THTensor structure:

typedef struct THTensor
{
    int64_t *size;
    int64_t *stride;
    int nDimension;
    THStorage *storage;
    ptrdiff_t storageOffset;
    int refcount;
    char flag;
} THTensor;

(Code from THTensor.h)

And as you can see, the main THTensor structure holds the size/strides/dimensions/offsets/etc as well as the storage (THStorage) for the Tensor data.

We can summarize all this structure that we saw in the diagram below:

Now, once we have requirements such as multi-processing where we want to share tensor data among multiple different processes, we need a shared memory approach to solve it, otherwise, every time another process needs a tensor or even when you want to implement Hogwild training procedure where all different processes will write to the same memory region (where the parameters are), you’ll need to make copies between processes, and this is very inefficient. Therefore we’ll discuss in the next section a special kind of storage for Shared Memory.

Shared Memory

Shared memory can be implemented in many different ways depending on the platform support. PyTorch supports some of them, but for the sake of simplicity, I’ll talk here about what happens on MacOS using the CPU (instead of GPU). Since PyTorch supports multiple shared memory approaches, this part is a little tricky to grasp into since it involves more levels of indirection in the code.

PyTorch provides a wrapper around the Python multiprocessing module and can be imported from torch.multiprocessing. The changes they implemented in this wrapper around the official Python multiprocessing were done to make sure that everytime a tensor is put on a queue or shared with another process, PyTorch will make sure that only a handle for the shared memory will be shared instead of a new entire copy of the Tensor.

Now, many people aren’t aware of a Tensor method from PyTorch called share_memory_(), however, this function is what triggers an entire rebuild of the storage memory for that particular Tensor. What this method does is to create a region of shared memory that can be used among different processes. This function will, in the end, call this following function below:

static THStorage* THPStorage_(newFilenameStorage)(ptrdiff_t size)
{
  int flags = TH_ALLOCATOR_MAPPED_SHAREDMEM | TH_ALLOCATOR_MAPPED_EXCLUSIVE;
  std::string handle = THPStorage_(__newHandle)();
  auto ctx = libshm_context_new(NULL, handle.c_str(), flags);
  return THStorage_(newWithAllocator)(size, &THManagedSharedAllocator, (void*)ctx);
}

(Code from StorageSharing.cpp)

And as you can see, this function will create another storage using a special allocator called THManagedSharedAllocator. This function first defines some flags and then it creates a handle which is a string in the format /torch_[process id]_[random number], and after that, it will then create a new storage using the special THManagedSharedAllocator. This allocator has function pointers to an internal PyTorch library called libshm, that will implement a Unix Domain Socket communication to share the shared memory region handles. This allocator is actual an especial case and it is a kind of “smart allocator” because it contains the communication control logic as well as it uses another allocator called THRefcountedMapAllocator that will be responsible for creating the actual shared memory region and call mmap() to map this region to the process virtual address space.

Note: when a method ends with a underscore in PyTorch, such as the method called share_memory_(), it means that this method has an in-place effect, and it will change the current object instead of creating a new one with the modifications.

I’ll now show a Python example of one processing using the data from a Tensor that was allocated on another process by manually exchanging the shared memory handle:

This is executed in the process A:

>>> import torch
>>> tensor_a = torch.ones((5, 5))
>>> tensor_a

 1  1  1  1  1
 1  1  1  1  1
 1  1  1  1  1
 1  1  1  1  1
 1  1  1  1  1
[torch.FloatTensor of size 5x5]

>>> tensor_a.is_shared()
False
>>> tensor_a = tensor_a.share_memory_()
>>> tensor_a.is_shared()
True
>>> tensor_a_storage = tensor_a.storage()
>>> tensor_a_storage._share_filename_()
(b'/var/tmp/tmp.0.yowqlr', b'/torch_31258_1218748506', 25)

In this code, executed in the process A, we create a new Tensor of 5×5 filled with ones. After that we make it shared and print the tuple with the Unix Domain Socket address as well as the handle. Now we can access this memory region from another process B as shown below:

Code executed in the process B:

>>> import torch
>>> tensor_a = torch.Tensor()
>>> tuple_info = (b'/var/tmp/tmp.0.yowqlr', b'/torch_31258_1218748506', 25)
>>> storage = torch.Storage._new_shared_filename(*tuple_info)
>>> tensor_a = torch.Tensor(storage).view((5, 5))

 1  1  1  1  1
 1  1  1  1  1
 1  1  1  1  1
 1  1  1  1  1
 1  1  1  1  1
[torch.FloatTensor of size 5x5]

As you can see, using the tuple information about the Unix Domain Socket address and the handle we were able to access the Tensor storage from another process. If you change the tensor in this process B, you’ll also see that it will reflect in the process A because these Tensors are sharing the same memory region.

DLPack: a hope for the Deep Learning frameworks Babel

Now I would like to talk about something recent in the PyTorch code base, that is called DLPack. DLPack is an open standardization of an in-memory tensor structure that will allow exchange tensor data between frameworks, and what is quite interesting is that since this memory representation is standardized and very similar to the memory representation already in use by many frameworks, it will allow a zero-copy data sharing between frameworks, which is a quite amazing initiative given the variety of frameworks we have today without inter-communication among them.

This will certainly help to overcome the “island model” that we have today between tensor representations in MXNet, PyTorch, etc, and will allow developers to mix framework operations between frameworks and all the benefits that a standardization can bring to the frameworks.

The core of DLPack os a very simple structure called DLTensor, as shown below:

/*!
 * \brief Plain C Tensor object, does not manage memory.
 */
typedef struct {
  /*!
   * \brief The opaque data pointer points to the allocated data.
   *  This will be CUDA device pointer or cl_mem handle in OpenCL.
   *  This pointer is always aligns to 256 bytes as in CUDA.
   */
  void* data;
  /*! \brief The device context of the tensor */
  DLContext ctx;
  /*! \brief Number of dimensions */
  int ndim;
  /*! \brief The data type of the pointer*/
  DLDataType dtype;
  /*! \brief The shape of the tensor */
  int64_t* shape;
  /*!
   * \brief strides of the tensor,
   *  can be NULL, indicating tensor is compact.
   */
  int64_t* strides;
  /*! \brief The offset in bytes to the beginning pointer to data */
  uint64_t byte_offset;
} DLTensor;

(code from dlpack.h)

As you can see, there is a data pointer for the raw data as well as shape/stride/offset/GPU vs CPU, and other metadata information about the data that the DLTensor pointing to.

There is also a managed version of the tensor that is called DLManagedTensor, where the frameworks can provide a context and also a “deleter” function that can be called by the framework who borrowed the Tensor to inform the other framework that the resources are no longer required.

In PyTorch, if you want to convert to or from a DLTensor format, you can find both C/C++ methods for doing that or even in Python you can do that as shown below:

import torch
from torch.utils import dlpack

t = torch.ones((5, 5))
dl = dlpack.to_dlpack(t)

This Python function will call the toDLPack function from ATen, shown below:

DLManagedTensor* toDLPack(const Tensor& src) {
  ATenDLMTensor * atDLMTensor(new ATenDLMTensor);
  atDLMTensor->handle = src;
  atDLMTensor->tensor.manager_ctx = atDLMTensor;
  atDLMTensor->tensor.deleter = &deleter;
  atDLMTensor->tensor.dl_tensor.data = src.data_ptr();
  int64_t device_id = 0;
  if (src.type().is_cuda()) {
    device_id = src.get_device();
  }
  atDLMTensor->tensor.dl_tensor.ctx = getDLContext(src.type(), device_id);
  atDLMTensor->tensor.dl_tensor.ndim = src.dim();
  atDLMTensor->tensor.dl_tensor.dtype = getDLDataType(src.type());
  atDLMTensor->tensor.dl_tensor.shape = const_cast<int64_t*>(src.sizes().data());
  atDLMTensor->tensor.dl_tensor.strides = const_cast<int64_t*>(src.strides().data());
  atDLMTensor->tensor.dl_tensor.byte_offset = 0;
  return &(atDLMTensor->tensor);
}

As you can see, it’s a pretty simple conversion, casting the metadata from the PyTorch format to the DLPack format and assigning a pointer to the internal Tensor data representation.

I really hope that more frameworks adopt this standard that will certainly give benefits to the ecosystem. It is also interesting to note that a potential integration with Apache Arrow would be amazing.

That’s it, I hope you liked this long post !

– Christian S. Perone

Cite this article as: Christian S. Perone, "PyTorch – Internal Architecture Tour," in Terra Incognita, 12/03/2018, https://blog.christianperone.com/2018/03/pytorch-internal-architecture-tour/.

I'm starting a new course "Machine Learning: Foundations and Engineering" for 2024.