Using pyearthquake to plot Japan USGS earthquake data into the near real-time MODIS satellite imagery
The aim of this post is to show to the reader how to plot the recent Japan earthquake data from the USGS using the pyearthquake module. If you want to know more information about the pyearthquake module, take a look in this post where I previously used it. pyearthquake is a pure-python module which exposes an API to retrieve data from the USGS site as well from the MODIS Rapid Response System (recently, they created a separate project to handle Japan daily images).
Installing pyearthquake
The first thing we need to do is to install the Python pyearthquake module, you can do it using easy_install from setuptools:
easy_install pyearthquake
The easy_install should automatically handle the required modules, but if you face problems (specially in Ubuntu with basemap, here is the version requirements: matplotlib >= 0.99.0, numpy >= 1.3.0, PIL >= 1.1.6 and basemap >= 0.99.4.
Retrieving USGS catalogs
USGS provides the follow catalog datasets:
M1+ Earthquakes (past hour) – M1+PAST_HOUR
This is the worldwide catalog with earthquake data from the past hour;
M1+ Earthquakes (past day) – M1+PAST_DAY
This is the worldwide catalog with earthquake data from the past day;
M1+ Earthquakes (past 7 days) – M1+PAST_7DAY
This is the worldwide catalog with earthquake data from the past 7 days;
This is how you retrieve any of these catalogs using pyearthquake:
>>> from pyearthquake import *
>>> catalog = usgs.retrieve_catalog("M1+PAST_7DAY")
>>> len(catalog)
1179
In that context, we have 1179 incidents with magnitude 1+ from the past 7 days.
Lets filter now only events with magnitude 6+, which represents the recent significant earthquakes:
>>> mag6_list = [event for event in catalog if float(event["Magnitude"]) >= 6.0]
>>> len(mag6_list)
30
We have now 30 events with magnitude 6+ from the past 7 days, let’s print it:
>>> for row in mag6_list:
...    print row["Eqid"], row["Magnitude"], row["Depth"],
...          row["Datetime"], row["Depth"], row["Region"]
...
c0001z5z 6.3 8.70 Friday, March 11, 2011 20:11:22 UTC 8.70 near the east coast of Honshu, Japan
c0001z4n 6.6 10.00 Friday, March 11, 2011 19:46:49 UTC 10.00 near the west coast of Honshu, Japan
c0001z2t 6.1 24.80 Friday, March 11, 2011 19:02:58 UTC 24.80 near the east coast of Honshu, Japan
c0001z2a 6.2 10.00 Friday, March 11, 2011 18:59:15 UTC 10.00 near the west coast of Honshu, Japan
c0001yib 6.2 18.90 Friday, March 11, 2011 15:13:14 UTC 18.90 near the east coast of Honshu, Japan
c0001y4u 6.5 11.60 Friday, March 11, 2011 11:36:39 UTC 11.60 near the east coast of Honshu, Japan
(...)
As you can see, almost all last events are earthquakes from the Japan coast. Here, you can extract any individual event and retrieve USGS products like ShakeMaps, etc (see more information in this post on how to fetch and show those USGS products).
Plotting events into the map
Now we will plot those events into the map (pyearthquake uses the matplotlib toolkit called basemap to plot events into the map):
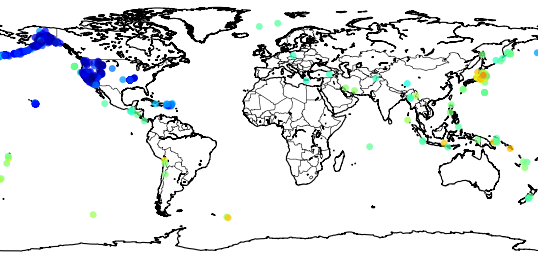
>>> usgs.plot_events(catalog)
The “catalog” variable is the same we retrieved before using the USGS M1+PAST_7DAY catalog.
Here is what what this statement will show:
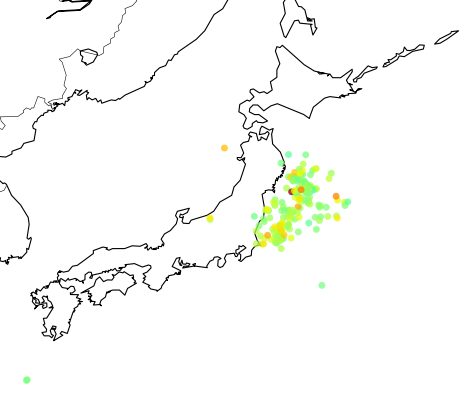
Now we can zoom into Japan using the button ![]() , and this is the result:
, and this is the result:
 The colored dots are the events from the retrieved catalog, the more strong the color the more strong was the earthquake; see the dark red color near the cost, that event was the unfortunate and catastrophic 8.9 magnitude earthquake which devastated Japan yesterday.
Retrieving near real-time MODIS Rapid Response images
MODIS has processed image subsets of Aqua and Terra satellites. One of these subsets is called “japan” and it has the entire country coverage. Let’s retrieve this MODIS subset and then plot our events in this same map:
>>> import datetime
>>> now = datetime.datetime.now()
>>> bmap = modis.get_modis_subset(now,
                              "Japan",
                              satellite_name="terra",
                              resolution="250m",
                              show=False)
>>> usgs.plot_events(catalog, bmap)
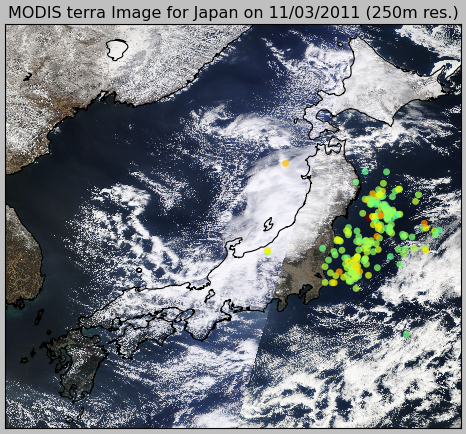
What pyearthquake is going to do here is to download (this may take some time) the entire subset for the resolution of 250m (the best available), parse the subset metadata, align image into the map between the lat/lng bounds and then plot the events over this satellite image, so we’ll have the last high resolution satellite images from the Japan together with the earthquake events plot, and here is the result:
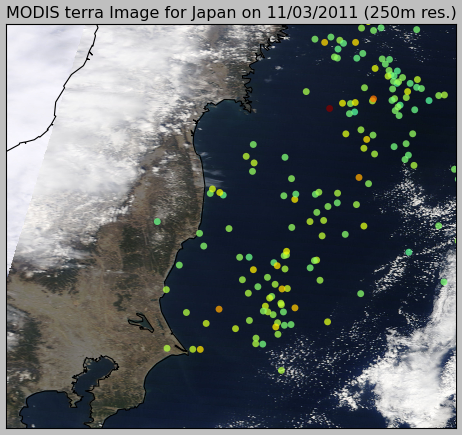
And here is the zoom near the coast:


This is awesome! I’m just gotten 4 ideas for new projects thanks to this post. I didn’t even know these libraries existed
I’m glad you liked it ! Good luck on your projects =)
Great post, and a nice introduction to basemap.
I was able to the get the example working on Ubuntu 10.10 using the following to install the dependencies:
sudo apt-get install python-matplotlib
pip install numpy
export GEOS_DIR=/usr/local/geos/3.2.2
pip install http://sourceforge.net/projects/matplotlib/files/matplotlib-toolkits/basemap-1.0.1/basemap-1.0.1.tar.gz/download
pip install pyearthquake
One small correction… during the post you switched from using the variable mag6_list to using magnitude6.
Thanks for the information Tyler, I’ll fix the post.
You might be interested in this site: http://www.japanquakemap.com/
It does a very similar thing to what you’re doing. It was developed by Paul Nicholls from the University of Canterbury in New Zealand. He based it on his earlier web site http://www.christchurchquakemap.co.nz/ which was developed to show a time lapse view of the Christchurch earthquakes since Sep 4 last year.
Thanks Simon, it seems to be a very nice visualization tool, I’ll take a look !