Tag: programming

Machine Learning, Math, Programming, Python

Privacy-preserving sentence semantic similarity using InferSent embeddings and secure two-party computation

Privacy-preserving Computation

Privacy-preserving computation or secure computation is a sub-field of cryptography where two (two-party, or 2PC) or multiple (multi-party, or MPC) parties can evaluate a function together without revealing information about the parties private input data to each other. The problem and the first solution to it were introduced in 1982 by an amazing breakthrough done by Andrew Yao on what later became known as the “Yao’s Millionaires’ problem“.

The Yao’s Millionaires Problem is where two millionaires, Alice and Bob, who are interested in knowing which of them is richer but without revealing to each other their actual wealth. In other words, what they want can be generalized as that: Alice and Bob want jointly compute a function securely, without knowing anything other than the result of the computation on the input data (that remains private to them).

To make the problem concrete, Alice has an amount A such as $10, and Bob has an amount B such as $ 50, and what they want to know is which one is larger, without Bob revealing the amount B to Alice or Alice revealing the amount A to Bob. It is also important to note that we also don’t want to trust on a third-party, otherwise the problem would just be a simple protocol of information exchange with the trusted party.

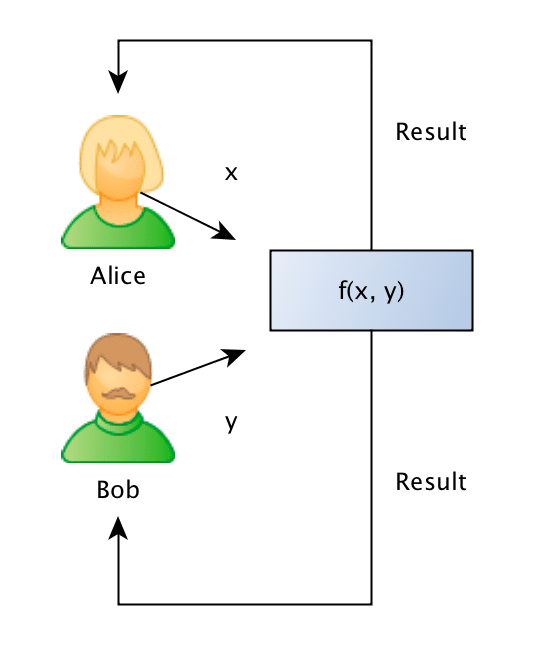
Formally what we want is to jointly evaluate the following function:

r = f(A, B)

Such as the private values A and B are held private to the sole owner of it and where the result r will be known to just one or both of the parties.

It seems very counterintuitive that a problem like that could ever be solved, but for the surprise of many people, it is possible to solve it on some security requirements. Thanks to the recent developments in techniques such as FHE (Fully Homomorphic Encryption), Oblivious Transfer, Garbled Circuits, problems like that started to get practical for real-life usage and they are being nowadays being used by many companies in applications such as information exchange, secure location, advertisement, satellite orbit collision avoidance, etc.

I’m not going to enter into details of these techniques, but if you’re interested in the intuition behind the OT (Oblivious Transfer), you should definitely read the amazing explanation done by Craig Gidney here. There are also, of course, many different protocols for doing 2PC or MPC, where each one of them assumes some security requirements (semi-honest, malicious, etc), I’m not going to enter into the details to keep the post focused on the goal, but you should be aware of that.

The problem: sentence similarity

What we want to achieve is to use privacy-preserving computation to calculate the similarity between sentences without disclosing the content of the sentences. Just to give a concrete example: Bob owns a company and has the description of many different projects in sentences such as: “This project is about building a deep learning sentiment analysis framework that will be used for tweets“, and Alice who owns another competitor company, has also different projects described in similar sentences. 
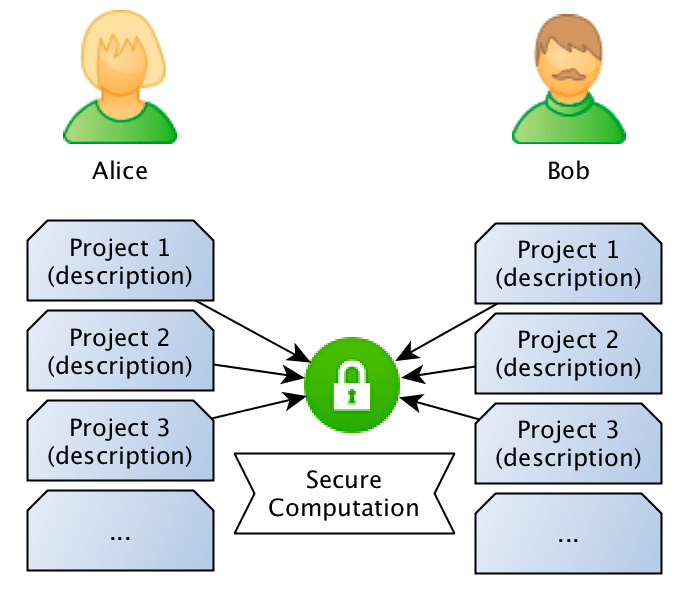
What they want to do is to jointly compute the similarity between projects in order to find if they should be doing partnership on a project or not, however, and this is the important point: Bob doesn’t want Alice to know the project descriptions and neither Alice wants Bob to be aware of their projects, they want to know the closest match between the different projects they run, but without disclosing the project ideas (project descriptions).

Sentence Similarity Comparison

Now, how can we exchange information about the Bob and Alice’s project sentences without disclosing information about the project descriptions ?

One naive way to do that would be to just compute the hashes of the sentences and then compare only the hashes to check if they match. However, this would assume that the descriptions are exactly the same, and besides that, if the entropy of the sentences is small (like small sentences), someone with reasonable computation power can try to recover the sentence.

Another approach for this problem (this is the approach that we’ll be using), is to compare the sentences in the sentence embeddings space. We just need to create sentence embeddings using a Machine Learning model (we’ll use InferSent later) and then compare the embeddings of the sentences. However, this approach also raises another concern: what if Bob or Alice trains a Seq2Seq model that would go from the embeddings of the other party back to an approximate description of the project ?

It isn’t unreasonable to think that one can recover an approximate description of the sentence given their embeddings. That’s why we’ll use the two-party secure computation for computing the embeddings similarity, in a way that Bob and Alice will compute the similarity of the embeddings without revealing their embeddings, keeping their project ideas safe.

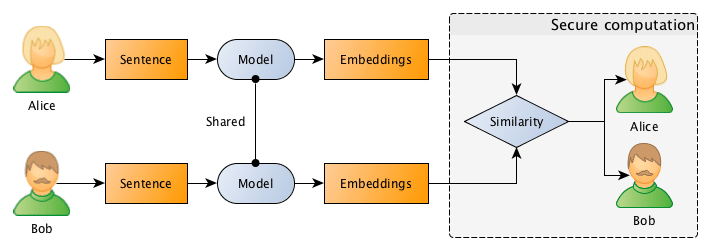
The entire flow is described in the image below, where Bob and Alice shares the same Machine Learning model, after that they use this model to go from sentences to embeddings, followed by a secure computation of the similarity in the embedding space.

Diagram overview of the entire process.

Generating sentence embeddings with InferSent

Bi-LSTM max-pooling network. Source: Supervised Learning of Universal Sentence Representations from Natural Language Inference Data. Alexis Conneau et al.

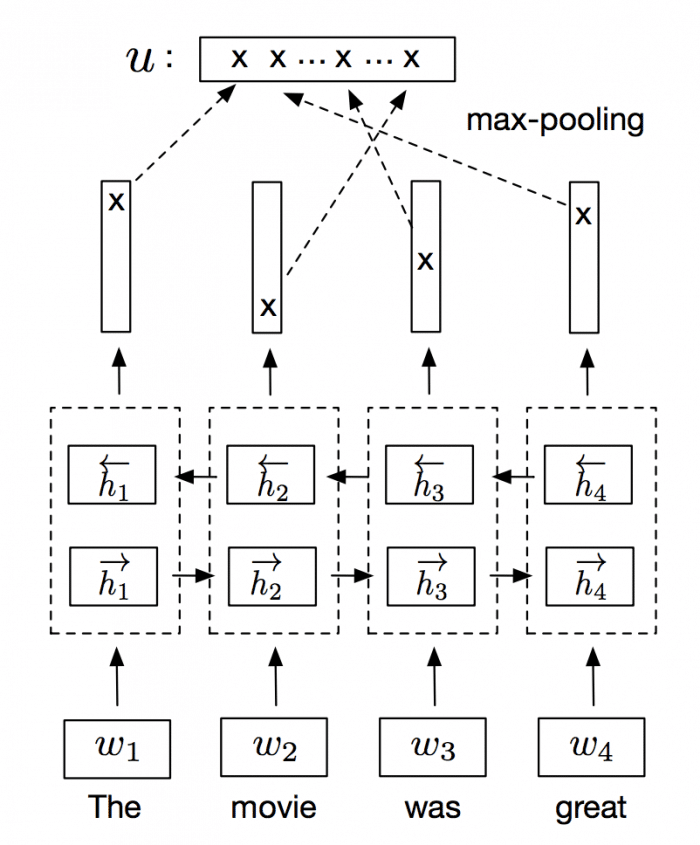
InferSent is an NLP technique for universal sentence representation developed by Facebook that uses supervised training to produce high transferable representations.

They used a Bi-directional LSTM with attention that consistently surpassed many unsupervised training methods such as the SkipThought vectors. They also provide a Pytorch implementation that we’ll use to generate sentence embeddings.

Note: even if you don’t have GPU, you can have reasonable performance doing embeddings for a few sentences.

The first step to generate the sentence embeddings is to download and load a pre-trained InferSent model:

import numpy as np
import torch

# Trained model from: https://github.com/facebookresearch/InferSent
GLOVE_EMBS = '../dataset/GloVe/glove.840B.300d.txt'
INFERSENT_MODEL = 'infersent.allnli.pickle'

# Load trained InferSent model
model = torch.load(INFERSENT_MODEL,
                   map_location=lambda storage, loc: storage)

model.set_glove_path(GLOVE_EMBS)
model.build_vocab_k_words(K=100000)

Now we need to define a similarity measure to compare two vectors, and for that goal, I’ll the cosine similarity (I wrote a tutorial about this similarity measure here) since it’s pretty straightforward:

cos(\pmb x, \pmb y) = \frac {\pmb x \cdot \pmb y}{||\pmb x|| \cdot ||\pmb y||}

As you can see, if we have two unit vectors (vectors with norm 1), the two terms in the equation denominator will be 1 and we will be able to remove the entire denominator of the equation, leaving only:

cos(\hat{x}, \hat{y}) =\hat{x} \cdot\hat{y}

So, if we normalize our vectors to have a unit norm (that’s why the vectors are wearing hats in the equation above), we can make the computation of the cosine similarity become just a simple dot product. That will help us a lot in computing the similarity distance later when we’ll use a framework to do the secure computation of this dot product.

So, the next step is to define a function that will take some sentence text and forward it to the model to generate the embeddings and then normalize them to unit vectors:

# This function will forward the text into the model and
# get the embeddings. After that, it will normalize it
# to a unit vector.

def encode(model, text):
    embedding = model.encode([text])[0]
    embedding /= np.linalg.norm(embedding)
    return embedding

As you can see, this function is pretty simple, it feeds the text into the model, and then it will divide the embedding vector by the embedding norm.

Now, for practical reasons, I’ll be using integer computation later for computing the similarity, however, the embeddings generated by InferSent are of course real values. For that reason, you’ll see in the code below that we create another function to scale the float values and remove the radix point and converting them to integers. There is also another important issue, the framework that we’ll be using later for secure computation doesn’t allow signed integers, so we also need to clip the embeddings values between 0.0 and 1.0. This will of course cause some approximation errors, however, we can still get very good approximations after clipping and scaling with limited precision (I’m using 14 bits for scaling to avoid overflow issues later during dot product computations):

# This function will scale the embedding in order to
# remove the radix point.
   
def scale(embedding):
    SCALE = 1 << 14
    scale_embedding = np.clip(embedding, 0.0, 1.0) * SCALE
    return scale_embedding.astype(np.int32)

You can use floating-point in your secure computations and there are a lot of frameworks that support them, however, it is more tricky to do that, and for that reason, I used integer arithmetic to simplify the tutorial. The function above is just a hack to make it simple. It’s easy to see that we can recover this embedding later without too much loss of precision.

Now we just need to create some sentence samples that we’ll be using:

# The list of Alice sentences
alice_sentences = [
    'my cat loves to walk over my keyboard',
    'I like to pet my cat',
]

# The list of Bob sentences
bob_sentences = [
    'the cat is always walking over my keyboard',
]

And convert them to embeddings:

# Alice sentences
alice_sentence1 = encode(model, alice_sentences[0])
alice_sentence2 = encode(model, alice_sentences[1])

# Bob sentences
bob_sentence1 = encode(model, bob_sentences[0])

Since we have now the sentences and every sentence is also normalized, we can compute cosine similarity just by doing a dot product between the vectors:

>>> np.dot(bob_sentence1, alice_sentence1)
0.8798542

>>> np.dot(bob_sentence1, alice_sentence2)
0.62976325

As we can see, the first sentence of Bob is most similar (~0.87) with Alice first sentence than to the Alice second sentence (~0.62).

Since we have now the embeddings, we just need to convert them to scaled integers:

# Scale the Alice sentence embeddings
alice_sentence1_scaled = scale(alice_sentence1)
alice_sentence2_scaled = scale(alice_sentence2)

# Scale the Bob sentence embeddings
bob_sentence1_scaled = scale(bob_sentence1)

# This is the unit vector embedding for the sentence
>>> alice_sentence1
array([ 0.01698913, -0.0014404 ,  0.0010993 , ...,  0.00252409,
        0.00828147,  0.00466533], dtype=float32)

# This is the scaled vector as integers
>>> alice_sentence1_scaled
array([278,   0,  18, ...,  41, 135,  76], dtype=int32)

Now with these embeddings as scaled integers, we can proceed to the second part, where we’ll be doing the secure computation between two parties.

Two-party secure computation

In order to perform secure computation between the two parties (Alice and Bob), we’ll use the ABY framework. ABY implements many difference secure computation schemes and allows you to describe your computation as a circuit like pictured in the image below, where the Yao’s Millionaire’s problem is described:

Yao’s Millionaires problem. Taken from ABY documentation (https://github.com/encryptogroup/ABY).

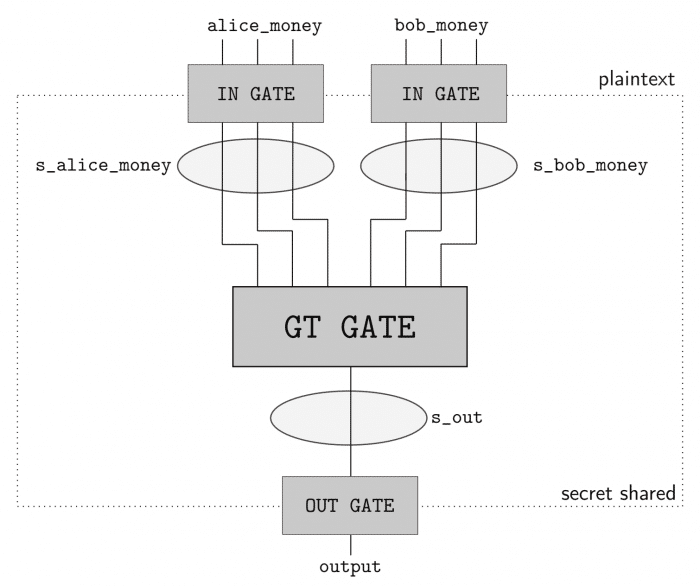
As you can see, we have two inputs entering in one GT GATE (greater than gate) and then a output. This circuit has a bit length of 3 for each input and will compute if the Alice input is greater than (GT GATE) the Bob input. The computing parties then secret share their private data and then can use arithmetic sharing, boolean sharing, or Yao sharing to securely evaluate these gates.

ABY is really easy to use because you can just describe your inputs, shares, gates and it will do the rest for you such as creating the socket communication channel, exchanging data when needed, etc. However, the implementation is entirely written in C++ and I’m not aware of any Python bindings for it (a great contribution opportunity).

Fortunately, there is an implemented example for ABY that can do dot product calculation for us, the example is here. I won’t replicate the example here, but the only part that we have to change is to read the embedding vectors that we created before instead of generating random vectors and increasing the bit length to 32-bits.

After that, we just need to execute the application on two different machines (or by emulating locally like below):

# This will execute the server part, the -r 0 specifies the role (server)
# and the -n 4096 defines the dimension of the vector (InferSent generates
# 4096-dimensional embeddings).
~# ./innerproduct -r 0 -n 4096

# And the same on another process (or another machine, however for another
# machine execution you'll have to obviously specify the IP).
~# ./innerproduct -r 1 -n 4096

And we get the following results:

Inner Product of alice_sentence1 and bob_sentence1  = 226691917
Inner Product of alice_sentence2 and bob_sentence1  = 171746521

Even in the integer representation, you can see that the inner product of the Alice’s first sentence and the Bob sentence is higher, meaning that the similarity is also higher. But let’s now convert this value back to float:

>>> SCALE = 1 << 14

# This is the dot product we should get
>>> np.dot(alice_sentence1, bob_sentence1)
0.8798542

# This is the inner product we got on secure computation
>>> 226691917 / SCALE**2.0
0.8444931

# This is the dot product we should get
>>> np.dot(alice_sentence2, bob_sentence1)
0.6297632

# This is the inner product we got on secure computation
>>> 171746521 / SCALE**2.0
0.6398056

As you can see, we got very good approximations, even in presence of low-precision math and unsigned integer requirements. Of course that in real-life you won’t have the two values and vectors, because they’re supposed to be hidden, but the changes to accommodate that are trivial, you just need to adjust ABY code to load only the vector of the party that it is executing it and using the correct IP addresses/port of the both parties.

I hope you liked it !

– Christian S. Perone

Cite this article as: Christian S. Perone, "Privacy-preserving sentence semantic similarity using InferSent embeddings and secure two-party computation," in Terra Incognita, 22/01/2018, https://blog.christianperone.com/2018/01/privacy-preserving-infersent/.
CPP, Programming

Nanopipe: connecting the modern babel

logored

For more information, see official documentation site or the official Github repository.

arch

Hello everyone, I just released the Nanopipe project. Nanopipe is a library that allows you to connect different message queue systems (but not limited to) together. Nanopipe was built to avoid the glue code between different types of communication protocols/channels that is very common nowadays. An example of this is: you have an application that is listening for messages on an AMQP broker (ie. RabbitMQ) but you also have a Redis pub/sub source of messages and also a MQTT source from a weird IoT device you may have. Using Nanopipe, you can connect both MQTT and Redis to RabbitMQ without doing any glue code for that. You can also build any kind of complex connection scheme using Nanopipe.

arch2

Programming, Python

Simple and effective coin segmentation using Python and OpenCV

The new generation of OpenCV bindings for Python is getting better and better with the hard work of the community. The new bindings, called “cv2” are the replacement of the old “cv” bindings; in this new generation of bindings, almost all operations returns now native Python objects or Numpy objects, which is pretty nice since it simplified a lot and also improved performance on some areas due to the fact that you can now also use the optimized operations from Numpy and also enabled the integration with other frameworks like the scikit-image which also uses Numpy arrays for image representation.

In this example, I’ll show how to segment coins present in images or even real-time video capture with a simple approach using thresholding, morphological operators, and contour approximation. This approach is a lot simpler than the approach using Otsu’s thresholding and Watershed segmentation here in OpenCV Python tutorials, which I highly recommend you to read due to its robustness. Unfortunately, the approach using Otsu’s thresholding is highly dependent on an illumination normalization. One could extract small patches of the image to implement something similar to an adaptive Otsu’s binarization (like the one implemented in Letptonica – the framework used by Tesseract OCR) to overcome this problem, but let’s see another approach. For reference, see the output of the Otsu’s thresholding using an image taken with my webcam with a non-normalized illumination:


Original image vs Otsu binarization

1. Setting the Video Capture configuration

The first step to create a real-time Video Capture using the Python bindings is to instantiate the VideoCapture class, set the properties and then start reading frames from the camera:

import numpy as np
import cv2

cap = cv2.VideoCapture(0)
cap.set(cv2.cv.CV_CAP_PROP_FRAME_WIDTH, 1280)
cap.set(cv2.cv.CV_CAP_PROP_FRAME_HEIGHT, 720)

In newer versions (unreleased yet), the constants for CV_CAP_PROP_FRAME_WIDTH are now in the cv2 module, for now, let’s just use the cv2.cv module.

2. Reading image frames

The next step is to use the VideoCapture object to read the frames and then convert them to gray color (we are not going to use color information to segment the coins):

while True:
    ret, frame = cap.read()
    roi = frame[0:500, 0:500]
    gray = cv2.cvtColor(roi, cv2.COLOR_BGR2GRAY)

Note that here I’m extracting a small portion of the complete image (where the coins are located), but you don’t have to do that if you have only coins on your image. At this moment, we have the following gray image:

The original Gray image captured.

3. Applying adaptive thresholding

In this step we will apply the Adaptive Thresholding after applying a Gaussian Blur kernel to eliminate the noise that we have in the image:

gray_blur = cv2.GaussianBlur(gray, (15, 15), 0)
thresh = cv2.adaptiveThreshold(gray_blur, 255, cv2.ADAPTIVE_THRESH_GAUSSIAN_C,
cv2.THRESH_BINARY_INV, 11, 1)

See the effect of the Gaussian Kernel in the image:

The original gray image and the image after applying the Gaussian Kernel.

And now the effect of the Adaptive Thresholding with the blurry image:

The effect of the adaptive thresholding into the blurry image

Note that at that moment we already have the coins segmented except for the small noisy inside the center of the coins and also in some places around them.

4. Morphology

The Morphological Operators are used to dilate, erode and other operations on the pixels of the image. Here, due to the fact that sometimes the camera can present some artifacts, we will use the Morphological Operation of Closing to make sure that the borders of the coins are always close, otherwise, we may found a coin with a semi-circle or something like that. To understand the effect of the Closing operation (which is the operation of erosion of the pixels already dilated) see the image below:

Morphological Closing

You can see that after some iterations of the operation, the circles start to become filled. To use the Closing operation, we’ll use the morphologyEx function from the OpenCV Python bindings:

kernel = np.ones((3, 3), np.uint8)
closing = cv2.morphologyEx(thresh, cv2.MORPH_CLOSE, kernel, iterations=4)

See now the effect of the Closing operation on our coins:

Closing Operation in the coins

The operations of Morphological Operators are very simple, the main principle is the application of an element (in our case we have a block element of 3×3) into the pixels of the image. If you want to understand it, please see this animation explaining the operation of Erosion.

5. Contour detection and filtering

After applying the morphological operators, all we have to do is to find the contour of each coin and then filter the contours having an area smaller or larger than a coin area. You can imagine the procedure of finding contours in OpenCV as the operation of finding connected components and their boundaries. To do that, we’ll use the OpenCV findContours function.

cont_img = closing.copy()
contours, hierarchy = cv2.findContours(cont_img, cv2.RETR_EXTERNAL,
cv2.CHAIN_APPROX_SIMPLE)

Note that we made a copy of the closing image because the function findContours will change the image passed as the first parameter, we’re also using the RETR_EXTERNAL flag, which means that the contours returned are only the extreme outer contours. The parameter CHAIN_APPROX_SIMPLE will also return a compact representation of the contour, for more information see here.

After finding the contours, we need to iterate into each one and check the area of them to filter the contours containing an area greater or smaller than the area of a coin. We also need to fit an ellipse to the contour found. We could have done this using the minimum enclosing circle, but since my camera isn’t perfectly above the coins, the coins appear with a small inclination describing an ellipse.

for cnt in contours:
    area = cv2.contourArea(cnt)
    if area < 2000 or area > 4000:
        continue

    if len(cnt) < 5:
        continue

    ellipse = cv2.fitEllipse(cnt)
    cv2.ellipse(roi, ellipse, (0,255,0), 2)

Note that in the code above we are iterating on each contour, filtering coins with area smaller than 2000 or greater than 4000 (these are hardcoded values I found for the Brazilian coins at this distance from the camera), later we check for the number of points of the contour because the function fitEllipse needs a number of points greater or equal than 5 and finally we use the ellipse function to draw the ellipse in green over the original image.

To show the final image with the contours we just use the imshow function to show a new window with the image:

cv2.imshow('final result', roi)

And finally, this is the result in the end of all steps described above:

The final image with the contours detected

The complete source-code:

import numpy as np
import cv2

def run_main():
    cap = cv2.VideoCapture(0)
    cap.set(cv2.cv.CV_CAP_PROP_FRAME_WIDTH, 1280)
    cap.set(cv2.cv.CV_CAP_PROP_FRAME_HEIGHT, 720)

    while(True):
        ret, frame = cap.read()
        roi = frame[0:500, 0:500]
        gray = cv2.cvtColor(roi, cv2.COLOR_BGR2GRAY)

        gray_blur = cv2.GaussianBlur(gray, (15, 15), 0)
        thresh = cv2.adaptiveThreshold(gray_blur, 255, cv2.ADAPTIVE_THRESH_GAUSSIAN_C,
                                       cv2.THRESH_BINARY_INV, 11, 1)

        kernel = np.ones((3, 3), np.uint8)
        closing = cv2.morphologyEx(thresh, cv2.MORPH_CLOSE,
        kernel, iterations=4)

        cont_img = closing.copy()
        contours, hierarchy = cv2.findContours(cont_img, cv2.RETR_EXTERNAL,
                                               cv2.CHAIN_APPROX_SIMPLE)

        for cnt in contours:
            area = cv2.contourArea(cnt)
            if area < 2000 or area > 4000:
                continue

            if len(cnt) < 5:
                continue

            ellipse = cv2.fitEllipse(cnt)
            cv2.ellipse(roi, ellipse, (0,255,0), 2)

        cv2.imshow("Morphological Closing", closing)
        cv2.imshow("Adaptive Thresholding", thresh)
        cv2.imshow('Contours', roi)

        if cv2.waitKey(1) & 0xFF == ord('q'):
            break

    cap.release()
    cv2.destroyAllWindows()

if __name__ == "__main__":
    run_main()
Programming, Python

Accessing HP Cloud OpenStack Nova using Python and Requests

So, my request to enter on the free and private beta season of the new HP Cloud Services was gently accepted by the HP Cloud team, and today I finally got some time to play with the OpenStack API at HP Cloud. I’ll start with the first impressions I had with the service:

The user interface of the management is very user-friendly, the design is much like of the Twitter Bootstrap, see the screenshot below of the “Compute” page from the “Manage” section:

As you can see, they have a set of 4 Ubuntu images and a CentOS, I think that since they are still in the beta period, soon we’ll have more default images to use.

Here is a screenshot of the instance size set:

Since they are using OpenStack, I really think that they should have imported the vocabulary of the OpenStack into the user interface, and instead of calling it “Size”, it would be more sensible to use “Flavour“.

The user interface still doesn’t have many features, something that I would really like to have is a “Stop” or something like that for the instances, only the “Terminate” function is present on the Manage interface, but those are details that they should be still working on since they’re only in beta.

Another important info to cite is that the access to the instances are done through SSH using a generated RSA key that they provide to you.

Let’s dig into the OpenStack API now.

OpenStack API

To access the OpenStack API you’ll need the credentials for the authentication, HP Cloud services provide these keys on the Manage interface for each zone/service you have, see the screenshot below (with keys anonymized of course):

Now, OpenStack authentication could be done in different schemes, the scheme that I know that HP supports is the token authentication. I know that there is a lot of clients already supporting the OpenStack API (some have no documentation, some have weird API design, etc.), but the aim of this post is to show how easy would be to create a simple interface to access the OpenStack API using Python and Requests (HTTP for Humans !).

Let’s start defining our authentication scheme by sub-classing Requests AuthBase:

[enlighter lang=”python” ]
class OpenStackAuth(AuthBase):
def __init__(self, auth_user, auth_key):
self.auth_key = auth_key
self.auth_user = auth_user

def __call__(self, r):
r.headers[‘X-Auth-User’] = self.auth_user
r.headers[‘X-Auth-Key’] = self.auth_key
return r
[/enlighter]

As you can see, we’re defining the X-Auth-User and the X-Auth-Key in the header of the request with the parameters. These parameters are respectively your Account ID and  Access Key we cited earlier. Now, all you have to do is to make the request itself using the authentication scheme, which is pretty easy using Requests:

[enlighter lang=”python”]
ENDPOINT_URL = ‘https://az-1.region-a.geo-1.compute.hpcloudsvc.com/v1.1/’
ACCESS_KEY = ‘Your Access Key’
ACCOUNT_ID = ‘Your Account ID’
response = requests.get(ENDPOINT_URL, auth=OpenStackAuth(ACCOUNT_ID, ACCESS_KEY))
[/enlighter]

And that is it, you’re done with the authentication mechanism using just a few lines of code, and this is how the request is going to be sent to the HP Cloud service server:

 This request is sent to the HP Cloud Endpoint URL (https://az-1.region-a.geo-1.compute.hpcloudsvc.com/v1.1/). Let’s see now how the server answered this authentication request:

You can show this authentication response using Requests by printing the header attribute of the request Response object. You can see that the server answered our request with two important header items: X-Server-Management-URL and the X-Auth-Token. The management URL is now our new endpoint, is the URL we should use to do further requests to the HP Cloud services and the X-Auth-Token is the authentication Token that the server generated based on our credentials, these tokens are usually valid for 24 hours, although I haven’t tested it.

What we need to do now is to sub-class the Requests AuthBase class again but this time defining only the authentication token that we need to use on each new request we’re going to make to the management URL:

[enlighter lang=”python”]
class OpenStackAuthToken(AuthBase):
def __init__(self, request):
self.auth_token = request.headers[‘x-auth-token’]

def __call__(self, r):
r.headers[‘X-Auth-Token’] = self.auth_token
return r
[/enlighter]

Note that the OpenStackAuthToken is receiving now a response request as parameter, copying the X-Auth-Token and setting it on the request.

Let’s consume a service from the OpenStack API v.1.1, I’m going to call the List Servers API function, parse the results using JSON and then show the results on the screen:

[enlighter lang=”python”]
# Get the management URL from the response header
mgmt_url = response.headers[‘x-server-management-url’]

# Create a new request to the management URL using the /servers path
# and the OpenStackAuthToken scheme we created
r_server = requests.get(mgmt_url + ‘/servers’, auth=OpenStackAuthToken(response))

# Parse the response and show it to the screen
json_parse = json.loads(r_server.text)
print json.dumps(json_parse, indent=4)
[/enlighter]

And this is what we get in response to this request:

[enlighter]
{
“servers”: [
{
“id”: 22378,
“uuid”: “e2964d51-fe98-48f3-9428-f3083aa0318e”,
“links”: [
{
“href”: “https://az-1.region-a.geo-1.compute.hpcloudsvc.com/v1.1/20817201684751/servers/22378”,
“rel”: “self”
},
{
“href”: “https://az-1.region-a.geo-1.compute.hpcloudsvc.com/20817201684751/servers/22378”,
“rel”: “bookmark”
}
],
“name”: “Server 22378”
},
{
“id”: 11921,
“uuid”: “312ff473-3d5d-433e-b7ee-e46e4efa0e5e”,
“links”: [
{
“href”: “https://az-1.region-a.geo-1.compute.hpcloudsvc.com/v1.1/20817201684751/servers/11921”,
“rel”: “self”
},
{
“href”: “https://az-1.region-a.geo-1.compute.hpcloudsvc.com/20817201684751/servers/11921”,
“rel”: “bookmark”
}
],
“name”: “Server 11921”
}
]
}
[/enlighter]

And that is it, now you know how to use Requests and Python to consume OpenStack API. If you wish to read more information about the API and how does it works, you can read the documentation here.

– Christian S. Perone

CPP

C++11 user-defined literals and some constructions

I was taking a look at the proposal N2765 (user-defined literals) already implemented on the development snapshots of the GCC 4.7 and I was thinking in how user-defined literals can be used to create some interesting and sometimes strange constructions.

Introduction to user-defined literals

C++03 has some literals, like the “f” in “12.2f” that converts the double value to float. The problem is that these literals aren’t very flexible since they’re pretty fixed, so you can’t change them or create new ones. To overcome this situation, C++11 introduced the concept of “user-defined literals” that will give to the user, the ability to create new custom literal modifiers. The new user-defined literals can create either built-in types (e.g. int) or user-define types (e.g. classes), and the fact that they could be very useful is an effect that they can return objects instead of only primitives.

The new syntax for the user-defined literals is:

[enlighter lang=”C++”]
OutputType operator “” _suffix(const char *literal_string);
[/enlighter]

… in the case of a literal string. The OutputType is anything you want (object or primitive), the “_suffix” is the name of the literal modifier, isn’t required to use the underline in front of it, but if you don’t use you’ll get some warnings telling you that suffixes not preceded by the underline are reserved for future standardization.

Examples

Kmh to Mph converter

[enlighter lang=”C++” escaped=”true” lines=”1000″]
// stupid converter class
class Converter
{
public:
Converter(double kmph) : m_kmph(kmph) {};
~Converter() {};

double to_mph(void)
{ return m_kmph / 1.609344; }

private:
double m_kmph;
};

// user-defined literal
Converter operator “” kmph(long double kmph)
{ return Converter(kmph); }

int main(void)
{
std::cout << “Converter: ” << (80kmph).to_mph() << std::endl;
// note that I’m using parenthesis in order to
// be able to call the ‘to_mph’ method
return 0;
}
[/ccb]

Note that the literal for for numeric types should be either long double (for floating point literals) or unsigned long long (for integral literals). There is no signed type, because a signed literal is parsed as an expression with a sign as unary prefix and the unsigned number part.

std::string literal

[enlighter lang=”C++” escaped=”true” lines=”1000″]
std::string operator “” s (const char* p, size_t n)
{ return std::string(p,n); }

int main(void)
{
std::cout << "convert me to a string"s.length() << std::endl; // here you don't need the parenthesis, note that the // c-string was automagically converted to std::string return 0; } [/ccb]

system() call

[enlighter lang=”C++” escaped=”true” lines=”1000″]
int operator “” ex(const char *cmd, size_t num_chars)
{ return system(cmd); }

int main(void)
{
“ls -lah”ex;
return 0;
}
[/ccb]

alias and std::map

[enlighter lang=”C++” escaped=”true” lines=”1000″]
typedef std::map MyMap;
MyMap create_map()
{
MyMap m;
m[“lol”] = 7;
return m;
}
auto m = create_map();

int& operator “” m(const char *key, size_t length)
{ return m[key]; }

int main(void)
{
std::cout << "lol"m << std::endl; // 7 "lol"m = 2; std::cout << "lol"m << std::endl; // 2 return 0; } [/ccb]

References

Wikipedia :: C++11 (User-defined literals)

Proposal N2765

Genetic Algorithms, Pyevolve, Python

Pyevolve on Sony PSP ! (genetic algorithms on PSP)

Sony PSP can be more interesting than funny sometimes. Few people know about the potential of the PSP port of Stackless Python 2.5.2. This great port of python was done by Carlos E. and you can find more information about the progress of the port on his blog.

Well, I’ve tested the Pyevolve GA framework on the Stackless Python for PSP and for my surprise, it worked without changing one single line of code on the framework due the fact of Pyevolve has been written in pure Python (except the platform specific issue like the Interactive Mode, but this issue is automaticly disabled on unsupported platforms).

So now, we have Genetic Algorithms on PSP.

Follow some screenshots (click to enlarge):

psp2psp1

The GA running on the PSP screenshot is the minimization of the Sphere function.

Here is the steps to install Pyevolve on PSP:

PSP Stackless Python Installation

1) First, create a directory called “python” on your PSP under the “/PSP/GAME” and the directory structure “/python/site-packages/” on the root of your memory stick (this last directory will be used to put Pyevolve later).
2) Copy the EBOOT.PBP and the python.zip files to this created directory;

Pyevolve Installation

3) Download the Pyevolve source and copy the directory called “pyevolve” to the created directory “/python/site-packages/”, the final directory structure will be: “/python/site-packages/pyevolve”

Ready ! Now you can import Pyevolve modules inside scripts on your PSP, of course you can’t use the graphical plotting tool or some DB Adapters of Pyevolve, but the GA Core it’s working very well.

Here is some basic usage of PSP Stackless Python port. I’ve used the psp2d module to show the information on screen. When I got more time, I’ll port the visualization of the TSP problem to use the psp2d, it will be nice to see Traveling Salesperson Problem running with real-time visualization on PSP =)

Related Links

Google Code Project of PSP Stackless Python

I'm starting a new course "Machine Learning: Foundations and Engineering" for 2024.